GX-1 Disc Publisher For Microsoft Windows® 2000 & XP Users Manual Microboards Technology LLC Version 1.
• Introduction
MICROBOARDS TECHNOLOGY, LLC GX-1 DISC PUBLISHER TABLE OF CONTENTS INTRODUCTION ..............................................................................................................................................................4 WHAT’S INCLUDED ...........................................................................................................................................................4 SYSTEM REQUIREMENTS ..............................................................................
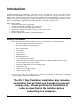
Introduction The Microboards GX-1 Disc Publisher is a single drive, 50 disc, print and record system. The GX-1 combines industrial strength printing and recording into a single, easy to use duplicator. The system includes one 16x DVD recorder. Microboards and HP co-developed the printer technology, allowing up to 4800 x 1200 dpi printing. The Prassi Technology Zulu 2 software is a dynamic interface for both beginners and power users.
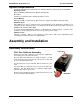
MICROBOARDS TECHNOLOGY, LLC GX-1 DISC PUBLISHER System Requirements The Microboards GX-1 Disc Publisher has the following minimum requirements and compatibilities: Operating System Microsoft Windows 2000 with SP4 or Windows XP with SP2. Processor Pentium 4 (or equivalent) CPU, running at 2.0 GHz or faster. System Memory Minimum 512 MB of system memory. More memory is suggested for DVD recording operation.
Installing Ink Cartridges Supported Ink Cartridges The GX-1 Disc Publisher uses a single color ink cartridge. The part number for this cartridge is GX200HC. If other cartridges are installed, the GX-1 Disc Publisher will not function. These cartridges are available from any Microboards reseller. Refill kits or non-Microboards ink cartridges are not recommended for use in the GX-1 Disc Publisher system. Use of these types of cartridges will cause the printer to fail.
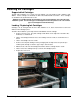
MICROBOARDS TECHNOLOGY, LLC GX-1 DISC PUBLISHER Loading Discs The next step is to load your GX-1 Disc Publisher with output discs. The system will accept CD or DVD 120 mm (12 cm) inkjet printable discs. If the disc does not have an inkjet printable surface, the ink will not adhere to the surface of the disc. The GX-1 Disc Publisher will only accept 12 cm discs. Business card or 8 cm discs are not supported by this system. Figure 1 Figure 2 Load the first 5 or 6 discs flat, as seen in figure 1.
GX-1 Disc Publisher Installation The GX-1 Disc Publisher installation disk includes an Installer that will walk you through the process step by step. Please use the Installer and follow the installation steps in order. The following installation sections are intended only as a reference for the installation process, not as a guide to installing the GX-1 Disc Publisher. Performing the installation out of order could result in an unsuccessful installation.
MICROBOARDS TECHNOLOGY, LLC GX-1 DISC PUBLISHER Windows XP The Windows Found New Hardware Wizard will appear during any installation, including when using the Installer. Please follow all directions in the order in which they appear when using the Installer. Turn on power to the GX-1 Disc Publisher. Turn on power to the PC.
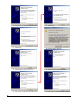
5. Select No, not this time and click Next. 9. Click Next. 6. Click Next. 10. Click Continue Anyway. 7. Click Finish for the next screen. 11. Click Finish for the next screen. 8. Select No, not this time and click Next. 12. Select No, not this time and click Next.
MICROBOARDS TECHNOLOGY, LLC 13. Click Next. 17. Click Next. 14. Click Continue Anyway. 18. Click Continue Anyway. 15. Click Finish for the next screen. 19. Click Finish. 16. Select No, not this time and click Next.
Setting Printer Alignment Alignment The GX-1 Disc Publisher system has been aligned at the factory. The factory alignment values are on a label on the back of the GX-1 Disc Publisher. Follow these steps to enter the factory values: • Click on the Start Button on your Windows computer. • Select Settings and then Printers. • Right click on the Microboards GX Series icon. • Select Printing Preferences. • Select the Utility Tab. • Click on the .1mm selection in the Resolution box.
MICROBOARDS TECHNOLOGY, LLC GX-1 DISC PUBLISHER Print Alignment Disc NOTE: The Alignment Disc should always be printed using Photo mode for the best accuracy. There are factory default alignment values for the TOP and LEFT values for your GX-1 Disc Publisher, referring to the top and left margin sizes, respectively. These can be found on the label on the back of the GX-1 Disc Publisher. You may need to adjust the values, depending on the images you are printing.
Printing Preferences Access the Printing Preferences by clicking the Start Button on your Windows computer. Select Settings and then select Printers. Right click on the Microboards GX Series icon, then select Printing Preferences. Paper/Quality Tab Print Quality • Best • Normal • Fast Print Modes • Text and Graphics • Photo Printing Recommendations Text and Graphics mode is used for printing mainly text information and small graphics.
MICROBOARDS TECHNOLOGY, LLC Advanced Features Advanced Features allow you to adjust the amount of ink placed on the disc using the Ink Volume setting, and adjust the Dry Time of the disc. Color Tab Saturation, Brightness and Color Tone allow you to fine tune your print image. Color Space defines the range of colors that can be printed. sRGB/sYCC will be the setting selected unless your image specifically was created using the AdobeRGB standard.
Utility Tab The Resolution setting should always be set at .1mm for best results. Alignment values will move the print image on the disc. The Outer and Inner Diameters will change the size of the area to be printed. To avoid excessive ink buildup, these values should never be set so that the GX1 Disc Publisher is printing off the media. If you have media with a printable inner hub separated from the rest of the disc by an unprintable ring, you can set the inner and outer hub diameters appropriately.
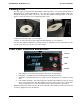
MICROBOARDS TECHNOLOGY, LLC GX-1 DISC PUBLISHER The GX-1 Disc Publisher and Zulu2 The first time the user launches Zulu2, the software will ask you to configure the GX-1 Disc Publisher system. This only needs to be done the first time the software is used. When launching Zulu2 for the first time, the following screen appears: When the GX-1 Disc Publisher is installed, Windows creates a new COM port. This new port is used by the GX1 Disc Publisher.
You will see an entry labeled “USB Serial Port (COMx)” entry for each GX-1 Disc Publisher you have installed. The COMx will be the COM port number to be entered into the Configure screen. Select the COM port as found on the Computer Management screen. Next, select the recorder. Finally, select the Printer. To confirm you have made the correct selection, you can click on the T box next to each item, as follows: • When the T is pressed for the COM Port, the disc flippers will move up and down.
MICROBOARDS TECHNOLOGY, LLC GX-1 DISC PUBLISHER Manual Software Re-Installation The information in this section will only apply to a manual re-installation of the individual software packages. If you have not yet installed the GX-1 Disc Publisher using the Installer, it is recommended that you do so. Installing the GX-1 Disc Publisher in an incorrect order could result in an unsuccessful installation.
If you wish to change the default Install directory, it can be done here. Click Next when completed. Next, you have options to add an icon to your desktop and/or a folder in the Start Menu. Once selected, click Next. Click Start to begin copying the files. The files will now be transferred from the CD to the operating system. Once completed, the finished screen will appear. You can choose to register the software online at this screen. Click Finish. Restart your computer.
MICROBOARDS TECHNOLOGY, LLC GX-1 DISC PUBLISHER Zulu2 Software Re-Installation Insert the Microboards GX-1 Disc Publisher Installation CD into the CD/DVD ROM drive on your computer. The installer should open automatically; click the Cancel button to exit the installer. Click the Start button and select Run from the Start menu. Click the Browse button, go to the CD/DVD drive and highlight PrassiTech Zulu2 (EFIGS).exe. Click the Open button, then click OK.
Troubleshooting Printer not printing: 1. Confirm the GX-1 Disc Publisher is plugged into a power source and is turned on. The ON/OFF switch is located at the back of the unit, above the power cable connector. 2. Confirm the green light on the power button is lit on the front panel. If AC power is on and the green light is off, press the power button firmly and wait for several seconds. If the light still does not come on, contact Microboards Technical Support. 3.
MICROBOARDS TECHNOLOGY, LLC GX-1 DISC PUBLISHER Printing Specifications Print Speed: Depends upon percentage of coverage and print mode selected Approx. 45 seconds for 100% full-color coverage, Photo Normal Mode Approx. 20 seconds for 100% full-color coverage, Text & Graphics Best Mode Approx.