
Specifications


Table Of Contents
- Content
- Welcome!
- Warranty
- 1. Getting Started
- 2. Software Configuration
- 3. Data Capturing
- 3.1. Open Files
- 3.2. Replay of Files
- 3.3. Editing Video Sequences
- 3.4. Saving Files
- 3.4.1. Setting the Recording Frame Rate
- 3.4.2. Setting the Recording Modes
- 3.4.3. Temporary Recording File
- 3.4.4. Saving Radiometric Video Sequences or AVI Files
- 3.4.5. Saving Image Data as Radiometric Snapshot or Text File
- 3.4.6. Saving Text File of the Temperature / Time Diagram
- 3.4.7. Location and Filename Templates of Triggered Recordings
- 3.4.8. Display of Snapshots in a Separate Window
- 3.4.9. Saving Images or Screenshots to Clipboard
- 4. Data Processing
- 5. Visual Camera (TIM200 only)
- Linescanner Mode
- 7. Further Information
thermoIMAGER TIM 43
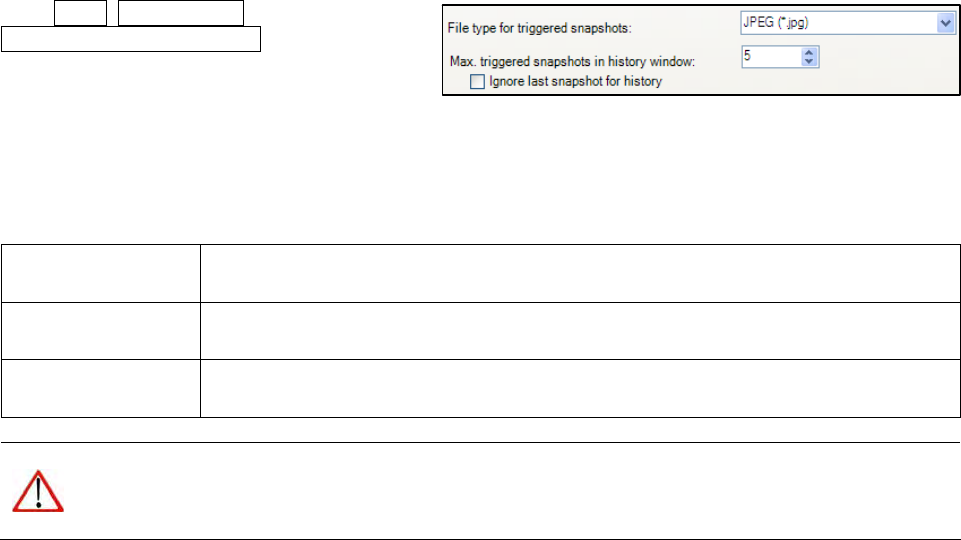
In the Tools, Configuration and
Trig. Recording / Snapshots menu you define
the File type for triggered snapshots.
The option Max. triggered snapshots in history
window sets the number of displayed snapshots in the separate window Snapshot history (please see section
2.2.1). If Ignore last sn
apshot for histor
y is activated only the latest snapshot will be displayed in the Snapshot
history window if a new snapshot is captured.
There are the following options to save image data:
TIFF (*.tiff) Saving of image (snapshot) as radiometric picture in TIFF format.
Text (Image data)
(*csv)
Saving of image (snapshot) as Text format to edit information in Excel.
Text (Temp. profile
data) (*csv)
Saving of temperature profile data only as Text format to edit information in Excel.
Note
The JPEG and TIFF files are saved as radiometric files and can be analyzed in detail with the TIM
Connect software. Furthermore, they can also be displayed in any standard program like Photoshop
showing the color information within the image.