
EasyTouch RV 359 Manual


4
©2022 Micro-Air Corp May 20, 2022, revision 1.3
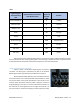
Table 1
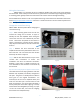
Disconnect the red or red/white wire labeled +7.5V and place a piece of tape around the exposed
wire end. Disconnect the remaining wires (tape is not necessary). Remove the cover to expose the two
screws that hold the thermostat to the wall and remove the rest of the thermostat.
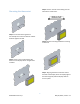
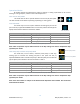
Using the push button terminals
Figure 1 shows a screwdriver depressing the push button
connector. The silver gate is opened for the wire to be inserted.
Releasing the button traps the wire and makes the connection.
Remove approximately 3/8 inch (1cm) of insulation from the
wire to be inserted. Use a small screwdriver (not provided) or similar
tool to push down on the square push button. Insert the wire in the
insertion space and release the push button. Verify the connection
by gently pulling on the wire. Do not force excessive wire down into
the connector. If the stripped wire end is longer than 3/8 inch, cut
the end so there is no bare wire sticking out when properly inserted.
Typical original
thermostat wire
color
Original factory wire harness
color (Write in here)
Connect to
EasyTouch
terminal
label
Function
Red or Red/White
R
+7.5VDC
Black or Green
B
-Ground
Orange or Tan
GL
Fan
Green
GH
Fan high
Yellow
Y
Cool
Violet or Orange
WHP
HP (heat pump)
White
W
Furnace
Not used
SEN
Sensor
Not used
SEN
Sensor
Figure 1