
EasyTouch RV 356 Manual

6
©2022 Micro-Air Corp May 16, 2022, revision 1.2
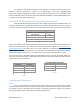
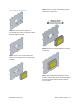
Micro-Air provides a 9-pin harness that will be used to interface between EasyTouch and the RV
manufacturer’s wires. One side plugs into EasyTouch RV while the other wire end side is used to make
your new wire connections. You will have to source or reuse electrical connectors to make these
connections.
EasyTouch will also have a pre-wired 2-pin connector and a pre-wired 4-pin connector attached
to the back. Connect the provided 4-to-3 pin adapter harness to EasyTouch. Strip away the black heat-
shrink on the orange/white stripe wire if the orange/white stripe wire is used. Cut off the 2-pin and 3-pin
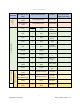
plugs as needed and use electrical connectors (not provided) to complete the installation per Table 4. Any
unused wires or plugs you can cut short or leave untouched.
When you know where each wire goes you should begin cutting wires. Move through them one
at a time, replacing an OEM thermostat wire with the appropriate EasyTouch wire until all the wires are
replaced.
Webasto (TrueAir) Special Considerations
Some Webasto (TrueAir) thermostats may have an additional consideration. Some of them had a
freeze sensor while some used an AGS (Auto-Generator Start) output, but never both. Inspect your OEM
thermostat wires for either two gray wires or a green wire. As per Table 4, connect your gray wires to the
gray wires of the Micro-Air 9-pin harness (polarity does not matter) or connect your green wire to the pin-
3 gray wire of the Micro-Air 9-pin harness. Pin-3 is the gray wire next to orange and red. See the Auto-Gen
Start section in Initial Setup Instructions to tell the thermostat how you have it wired.
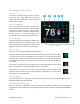
Re-apply Power
Restore DC power and the thermostat screen should light up and boot into the main menus. This
will happen if the four power wires are connected properly. All other wires control the outputs or are
sensors. Restore AC power so that your appliances can run again. Move on to the section Mounting the
Thermostat, or the section Initial Setup Instructions and mount the thermostat later.