
EasyTouch RV 356 Manual

4
©2022 Micro-Air Corp May 16, 2022, revision 1.2
Removing the Old Thermostat
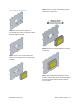
The original thermostats have a front cover that pops off. Behind the cover there are 2-4 mounting
screws that must be removed to free the back plate. Once the thermostat is removed, pull out some of
the wire from the wall to inspect how it was installed.
Some RV builders will use the proper plugs recommended by the original thermostat
manufacturer, which is also how EasyTouch RV is designed. This means you can simply unplug the
thermostat and proceed to the next section.
Other RV builders do not use the proper plugs and direct wire the thermostat to the RV
manufacturers wiring using wire crimps or similar. Some of them may use a mix of plugs and direct wire.
If the unit is direct-wired fully or in part then take some pictures of this wiring for reference. Be sure that
you can see where the thermostat wires meet with the wall wires as they are typically different colors.
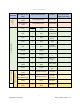
You can also write in Table 4 later in the section to record what color wires meet.
Wiring the Thermostat
Molex™ Plugs
If your installation was done with the proper mating Molex™ plugs, then you can simply plug in
all the mating connectors and move on to the section Mounting the Thermostat. The provided 9-pin (3x3)
wire harness will not be needed. Not all installations will use all plugs, just ensure that every original plug
has an EasyTouch match.
You may find the Molex™ plug coming from the wall has a 3-pin plug and EasyTouch comes with
a 4-pin plug installed. Use the provided 4-to-3 pin adapter harness in these systems, where the
orange/white wire is not used. If you have a 4-wire plug coming from the wall already then you will not
need the 4-to-3 pin adapter harness. If you find the 9-pin (3x3) is used but not a 4-or 3-pin then you will
use the relevant Direct-Wired section directions to complete the wiring.
If the plugs are not the standard Molex™ plugs that mate with EasyTouch then you will have to
wire it direct as described in the Direct-Wired section. You could also make up your own plugs but is
beyond what Micro-Air can assist with.
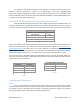
Direct-Wired
The original thermostat in these systems will have wires coming out of the back of it that are
connected to the RV manufacturer’s wiring harness, using a crimp-splice or similar. The wire colors on the
RV manufacturer’s harness can vary, but the wires at the back of the original thermostat are always the
same color for their use.
Follow the thermostat wires to where they are spliced to the RV manufacturer’s wire harness.
Write in the RV wiring harness colors in Table 4 below before making connections. Take pictures if you
have not already for reference as well. Some thermostats and harnesses may not have all of the wires
shown in Table 4. The important part is that every original wire has an EasyTouch match.