
EasyTouch RV 355 Manual

7
©2022 Micro-Air Corp March 15, 2022, revision 1.10
Setup
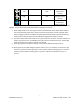
Setting the available modes
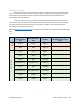
It is necessary to set up the available modes prior to operating your thermostat. Press the
settings button on the main screen. Select the available modes button on the settings
screen. Select cooling, Gas heat, or electric heat by pressing the icon. The red
circle with a line through it will disappear indicating the mode is available. Available modes must match
your original thermostat’s available modes. Use the zone button to set them appropriately for each
available zone.
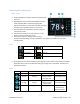
Heat output setup
There is text in the available modes screen that reads “Normal” as shipped from Micro-Air.
Pressing this text, changes the operating modes to different options to support specific thermostats.
Option 1 must be selected when replacing a thermostat with a model number of 9330-333.
These models feature fan speed control of the roof fans in heating modes. Press the “Normal” text in
the available modes screen to change the option to “Option 1” when replacing this thermostat. Please
note these systems used different control boards for this feature.
Option 2 must be selected when replacing a thermostat with model number 9430-334. Press the
“Normal” text in the available modes screen to change the text to “Option 2” when replacing this
thermostat. See Appendix C: 9430-334 wiring for more information on these systems.
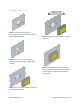
Connecting remotely
This thermostat may be operated remotely using either Bluetooth or WIFI.
Apps may be loaded from the Google Play store or Apple App store. The first time the
app is opened, it will ask to create an account. A WIFI connection on your smart device
is necessary for this step. Create your account and follow the prompts to connect your
thermostat.
If a second user is going to use the thermostat remotely, they can use the same account and
password as the first user. Each thermostat can only be assigned to a single account.
EasyTouch icon