EasyTouch 354 Operating Manual Revision 1.
Contents Installing the thermostat .............................................................................................................................. 3 Removing the old thermostat ................................................................................................................... 3 Wiring the thermostat .............................................................................................................................. 4 Mounting the thermostat ...........................
The EasyTouch 354 model thermostats were designed to directly replace Coleman™, Airxcel™ and RVP™ ZC thermostats. Original thermostats must have model numbers of 8330-331, 8330-335, or 8430-331 to be replaced by this thermostat. A typical example of this thermostat is shown in figure 1. Note the single slide switch and mode/zone button specific to this model. If your thermostat is not listed or as shown, please contact Micro-Air https://www.micro-air.
Wiring the thermostat Original thermostats can have a plug-in connector, or could be direct wired to the RV manufacturers wiring. Thermostats wired with a plug can simply unplug the original plug and plug in the EasyTouch RV thermostat. Micro-Air provides a connector to directly wire these thermostats to the wiring if the manufacturer has directly wired the thermostat. Match the original wiring colors to the provided EasyTouch connector colors to install the thermostat.
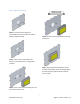
Mounting the thermostat Step 1: Locate the mounting buttons horizontally across the hole with the smaller diameter against the wall. Step 4: Remove mounting tab before mounting on the wall. Step 2: Screw in one screw and level the buttons so the display will be straight when installed. Step 5: Aligning the buttons with the holes in the back of the display. Press the display against the wall and gently slide the display down to lock it in place.
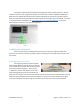
Initial setup instructions Setting the available modes It is necessary to set up the available modes prior to operating your thermostat. Press the settings button on the main screen. Select the available modes button on the settings screen. Select cooling, Gas heat, or electric heat by pressing the icon. The red circle with a line through it will disappear indicating the mode is available. Available modes must match your original thermostat’s available modes.
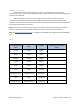
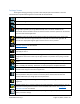
Table 2 Fan only Automatic Cool Only Zone on Gas heating Zone off Electric Heating 6. Pressing the fan icon selects between manual (always on) fan speeds and automatic fan speeds. Automatic will turn the fan off after the heating or cooling cycle is completed. See Table 3 for available fan speeds.
Away screen (Heat and cool set points) Away operation allows setting upper and lower limits for temperature with a non-operating area or “dead band” in the middle. This can be useful when setting a higher daytime cooling temperature and lower night time heating temperature. It can also be used to control the temperature extremes when you are away from the RV. The mode selected must be an automatic mode to allow both heating and cooling operation. 1.
Schedule screen Set points may be changed on a time-based schedule. The mode used will be the heating or cooling mode set on the main screen. Setting a change event 1. Events will show --:-- when the event is disabled. Press the hours position to set the hours. A flashing bar will appear under the hours along with up and down adjustment selectors. Use the adjustment selectors to change the hours. Press the minutes to move the flashing bar under the minutes and allow ¼ hour adjustments.
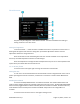
Settings Screen Pressing the settings gear brings up a menu with multiple options listed below. These are informational or operational changes that can be made to the thermostat. Last menu navigation. Next menu navigation. Return to main screen. Help Screen: The QR code will bring you to the Micro-Air EasyTouch page when selected using a QR compatible phone app. Below the QR code is the serial number for the thermostat and the firmware revision for the thermostat.
Gas Heat Override This feature turns on the gas furnace from an electric heat mode when the setpoint is five or mode degrees away from the ambient temperature and heating is required. It is only available on systems that have both gas and electric heating and is only active in electric heat or cool/electric heat modes. If heating setpoint is 5 degrees or more above the inside temperature in an electric heating mode, the furnace will come on along with the electric heater.
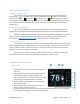
Notifications Notifications provide a way for the thermostat to communicate back to a smart device like a tablet or phone. These notifications are indications of the temperature exceeding a set limit. Limits are set by connecting to the thermostat in the app, selecting the settings gear, and then selecting notifications. A minimum and maximum allowed temperature can be set. Table 4 shows an example of operation with an 80°F maximum temperature set.
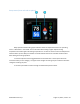
Appendix A: Installation Troubleshooting The most common problem is not knowing the thermostat operation. If the system is running a heating or cooling cycle, the set point will turn red for heating and blue for cooling. When the thermostat turns white, the heat pump, heat strip and furnace should all be off. The fan may continue to run for a while after the cycle completes. If a fan is left in a manual mode, it will not shut off.
Appendix B: Connecting remotely First connection steps 1. This thermostat uses BLE which is a special implementation of Bluetooth. It is not necessary to “Pair” the thermostat with the phone but an account must be created for operation. 2. Start the app on your smart device. The app will open and if you have not entered your account information, it will ask you to create an account. Enter your name, email and a password at the prompts. The system will send a confirmation email to your inbox.
Appendix C: 8430-331 wiring This table is for 8430-331 users only. This thermostat has different wiring not found in other thermostats.