
EasyTouch RV 350 Manual


3
©2021 Micro-Air Corp May 20, 2021, revision 1.4
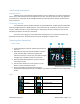
The EasyTouch 350 model thermostat was designed to replace certain Dometic™ multi-zone
capable thermostats. Original thermostats replaced by this model are a landscape format rectangular
design with a circular center display and 10 to 12 buttons. If your thermostat is not of this style, please
contact Micro-Air https://www.micro-air.com/SupportRequest to verify the thermostat you received is
correct for your application.
Installing the thermostat
There are three steps to installing the thermostat. First remove your old thermostat. Next
disconnect and reconnect the wiring. Finally install the mounting pins to the wall and mount your new
thermostat.
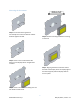
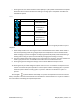
Removing the old thermostat
Depress the rectangular locking tab on the bottom of the thermostat with a small screw driver.
Pull the thermostat away from the wall from the bottom. Unplug the connector by depressing the
locking tab. Remove the back plate mounting screws and remove the back plate.
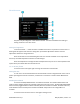
Wiring the thermostat
All models feature a simple telephone style modular jack. This is a six-pin version of a common
Ethernet connector with a press tab for removing the connector. Press the tab to remove the connector
from the old thermostat and insert it into the new thermostat.