Electronic Service Manuals This electronic document is provided as a service to our customers. We do not create the contents of the information contained in this document. Should you have detailed questions pertaining to the information contained in this document, you may contact Michco, or the manufacturer which provided the original information in this electronic deliverable. Michco’s only part in this electronic deliverable was the electronic assembly process.
ScrubMaster 30R OPERATING & MAINTENANCE INSTRUCTIONS INTRODUCTION READ THIS BOOK This operator’s book has important information for the use and safe operation of this machine. Read this book carefully before starting the machine. Keep this book and tell all operators to read the book. If you do not follow the instructions, you can cause an injury or damage equipment, furniture or buildings. For new books write to: Pacific 2259 S.
TABLE OF CONTENTS OPERATOR AND SAFETY INSTRUCTIONS ○ SYMBOLS USED ON THE MACHINE MACHINE PREPARATION ○ ○ ○ ○ ○ ○ ○ ○ ○ ○ ○ ○ ○ ○ ○ ○ ○ ○ ○ ○ ○ ○ ○ ○ ○ ○ ○ ○ ○ ○ ○ ○ ○ ○ ○ ○ ○ ○ ○ ○ ○ ○ ○ ○ ○ ○ ○ ○ ○ ○ ○ ○ ○ ○ OPERATION ○ ○ ○ ○ ○ ○ ○ ○ ○ ○ ○ ○ ○ ○ ○ ○ ○ ○ ○ ○ ○ ○ ○ ○ ○ ○ 1. STARTING WORK 2. MANUAL OPERATION 3. TRACTION 4. BRAKES 5. HORN 6.
OPERATOR AND SAFETY INSTRUCTIONS For the safe operation of this machine, read and understand all instructions before using this machine. WARNING: To reduce the risk of fire, electric shock or injury: 1. You must have training in the operation of the machine before using it. READ THE INSTRUCTION BOOK. If you do not understand any instruction, ask your supervisor. 2. Make sure all labels, decals, warnings, cautions and instructions are fastened to the machine. 3. Read the labels carefully on the machine.
SYMBOLS USED ON THE MACHINE Symbol for the solenoid valve: Indicates the solenoid valve switch. Symbol that indicates the solution tank is empty. RESERVE Symbol indicating the raised or lowered position of the brush base: Indicates the brush base lever position. Symbol for the counter-rotating brushes. Indicates the brush motor switch. Symbol for the vacuum motor: Indicates the vacuum motor switch. Symbol for the cylindrical brush motor. Indicates the cylindrical brush motor switch.
SYMBOLS USED ON THE MACHINE Symbol for the solution water valve. Symbol for speed control in forward or reverse. Symbol denoting forward or reverse drive. Symbol denoting general switch with key. ON/OFF AUTO Symbol indicating the switch to choose either automatic or manual operation.
MACHINE PREPARATION 1. UNPACKING THE MACHINE 1. 2. 3. 4. Use a fork truck to move the machine when packaged. Take off the outer package The machine is fixed on the pallet with wooden wedges that block the wheels. Take off the wheel wedges. 5. Using a ramp, get the machine down from the pallet, pushing it in reverse motion. Avoid violent blows to the base. 2. BATTERY INSTALLATION The six 6 volt, 305 AH batteries fit in the compartment under the solution tank.
MACHINE PREPARATION 6. 7. Unlock, then lower the solution tank. Reconnect the hose. 3. CHARGING THE BATTERIES NEVER ALLOW THE BATTERIES TO RUN COMPLETELY DOWN, recharge them within a few minutes after the battery indicator starts to blink “0” on the display (see section 5). Never leave the batteries completely discharged, even if the machine is not being used. When charging the batteries, keep the solution tank lifted and make sure the solution tank is empty before lifting it.
MACHINE PREPARATION 4. CONNECTING THE BATTERY CONNECTOR After charging the batteries, reconnect the battery connector (1) to the connector of the machine (2). 5. BATTERY INDICATOR The battery indicator is digital with 4 fixed positions and a blinking one. The numbers, which appear on the display, show the approximate charge level.
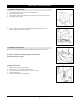
MACHINE PREPARATION 8. ADJUSTING THE SQUEEGEE HEIGHT The height from the floor to the squeegee should be adjusted based on the blade’s wear. Rotate the knob (2) clockwise (tighten) to lift the squeegee and counterclockwise (loosen) to lower it. Note: Adjust the right and left knobs the same amount; the squeegee should be positioned parallel to the floor. 9. CYLINDRICAL SWEEPING BRUSHES - ADJUSTING THE HEIGHT The height of the cylindrical brushes is dependent on the brush wear.
MACHINE PREPARATION 10. BRUSH ASSEMBLY CONTINUED 6. Invert the positions of the right and left brushes daily. However, if the brushes are not new and have deformed bristles, it is better to reassemble them in the same position. Because the different inclination of the bristles may cause an overload to the brush motor and excessive vibrations. Refer to the Daily Maintenance section for disassembly instructions. 11. HOPPER Confirm the hopper is clamped in place with the spring (1). 12. RECOVERY TANK 1. 2.
MACHINE PREPARATION 13. SOLUTION WATER Before filling the solution tank confirm the solution hose, located in the lower section of the machine beneath the operator, is securely attached. Open the cover and fill the solution tank with clean water at a temperature not more than 50°C/122°F. Add the proper concentration of liquid detergent by following the manufacturer instructions. Excess foam in the recovery tank can damage the vacuum motor, so use only the minimum amount of detergent necessary.
OPERATION 1. STARTING WORK 1. 2. 3. 4. 5. Carry out the operations for the preparation of the machine (see Machine Preparation). Sit on the driver’s seat. Release the parking brake (1). Connect the machine connector to the battery connector (2). Turn the key clockwise to the ON position (3). Both the green signal light (4) and the digital battery indicator will come on. 6. 7. 8. Switch to automatic operation (5). Press the brush switch (6). Push the brush lever down (7) to lower the brush base assembly.
OPERATION If a problem occurs during operation with the machine: 1. Immediately turn off the key (1). 2. Disconnect the battery connector from the machine connector (2). 3. Activate the emergency brake, push down and back (3) until coupled. These actions will disconnect all functions of the machine.
OPERATION 3. TRACTION This machine is equipped with electronically controlled traction. There are three forward and three reverse speeds. Forward or reverse movement are selected through the manipulator (1). Pressing the drive pedal starts the machine’s movement and the speed is adjusted through the knob (2). Note: The maximum gradient with a full load is 10% (5.7 degree incline). Note: In reverse, a buzzer will sound and the rear light will flash (optional equipment) .
OPERATION 5. HORN Push down on the switch shown to blow the horn. 6. ALARMS The machine is equipped with an alarm system that consists of a red blinking signal light. The lights blinking sequence is very helpful in identifying causes of machine anomalies. Each sequence corresponds to a failure. Reference “Alarm Descriptions” in the Parts and Service Manual.
UPON COMPLETION OF THE WORK After finishing your work and before any type of maintenance is done, it is necessary to do the following: 1. Close the water valve. 2. Switch the machine to manual mode using the “AUTO/MAN” switch (yellow signal light off). 3. Switch off the brush motor (1). 4. Turn off the solenoid valve switch (2). 5. 6. 7. 8. 9. Switch off the vacuum motor (3). Lift the squeegee with lever (4).
DAILY MAINTENANCE 1. CLEANING THE RECOVERY TANK AND FILTER Use gloves to protect yourself from contact with dangerous solutions 1. Unscrew the drain plug and completely empty the tank. 2. 3. 4. 5. Lift the solution tank. Take out the filter and rinse with water. For a more thorough cleaning, remove the filter from its housing and rinse. Check the float in the tank, make sure it is not obstructed. 6. 7. 8. Rinse out the recovery tank and clean the drain plug.
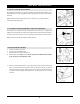
DAILY MAINTENANCE 3. CLEANING THE SOLUTION TANK AND FILTER 1. 2. 3. Open the water valve. Unscrew the filter and empty the solution tank. Clean the inside of the tank with clean water at a temperature not more than 50°C/ 122°F. Use gloves to protect yourself from contact with dangerous solutions 4. 5. Remove the cartridge from the filter and clean with water. Reassemble. 4. DISASSEMBLY OF THE ROTATING BRUSHES 1. 2. 3. 4. Connect the battery connector. Turn the key to the ON position.
WEEKLY MAINTENANCE 1. REPLACEMENT OF THE REAR SQUEEGEE BLADE If the rear squeegee blade is worn and does not dry the floor well, reverse the cleaning edge or replace it as follows: 1 . Push the fixing plates (1) by tapping with a hammer, then rotate them. 2 . Slip off the retainer and the squeegee blade. 3 . Turn the squeegee blade upside-down or if necessary, replace it. 4 . Reassemble everything repeating the above operations in reverse. 5 .
ADDITIONAL MAINTENANCE PROCEDURES 1. REPLACEMENT OF THE SPLASH GUARD Periodically check the condition of the splash guard on the brush base. If it is necessary to replace it, proceed as follows: 1. Remove the covers by slipping off the clips (1). 2. Unscrew the retaining blades from the splash guards. 3. Replace the splash guards and reassemble. 2. CYLINDRICAL BRUSH REPLACEMENT 1. 2. 3. 4. Connect the battery connector (1). Turn the key ON (2). Lift the squeegee (3).
TROUBLE SHOOTING GUIDE 1. INSUFFICIENT WATER ONTO THE BRUSHES 1. 2. 3. 4. 5. Make sure the water valve is open (1). Confirm there is water in the solution tank. Make sure the solenoid valve switch is on (2). Clean the solution filter (3). Check the solenoid valve. 2. THE SQUEEGEE DOES NOT DRY THE FLOOR WELL 1. 2. 3. 4. 5. 6. Check the squeegee adjustments (see Items 7 & 8 under “Machine Preparation”). Confirm the vacuum hose is securely attached and the drain hose is plugged.
TROUBLE SHOOTING GUIDE 5. THE MACHINE WILL NOT START 1. 2. 3. 4. 5. The operator must be properly seated in the driving position. Confirm the brake pedal (1) is completely released. Check that the connectors (2) are attached. The switch should be ON (3). Confirm the batteries are charged. 6. EXCESSIVE FOAM PRODUCTION Check that a low foam detergent has been used. If required, add a small quantity of antifoam liquid into the recovery tank.
NOTES 23
WARRANTY POLICY PACIFIC LIMITED WARRANTY The Pacific ScrubMaster 30R has been manufactured, tested and inspected in accordance with specific engineering requirements. This machine is WARRANTED to be free from defects in workmanship and materials for periods as follows from the date of purchase.