User Manual
Technical Specifications 1.1 Product Features RTEC R3800-F is a high-performance all-in-one UHF RFID reading and writing equipment, support ISO18000-6C protocol, working frequency band contains the national standard: FCC: 902.75MHz ~ 927.25MHz with recognition distance, fast speed, high accuracy, strong anti-interference ability, excellent protection performance and easy to install and use characteristics.
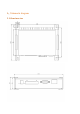
1.2 Main functions and technical performance parameters Device size 156x130x39mm Output Power 21.
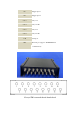
2、Schematic diagram 2.
2.
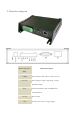
IN1 Trigger input 1 IN2 Trigger input 2 OUT1-1 relay1-On OUT1-2 relay1-COM OUT2-1 relay2-On OUT2-2 relay2-COM COM Serial port NET Network port (supports 10/100M Ethernet communication) 16 ways SMA external thread female head
2.3 Network application connection diagram The network interface is used for long-distance high-speed connection (not more than 80 m), and can be connected to a switch or router through a network cable, or directly to a PC network interface, as shown in the following figure. 3. Installation Instruction 3.
3.2 Installation conditions Before installing the reader, please carefully check whether the product is in good condition and whether the accessories are complete. If there is damage or shortage, please contact the supplier in time。 3.3 Device connection 3.3.1 Connect to power adapter ☆ Plug the power cord into the AC power supply socket, and then plug the other end of the power cord into the power interface of the reader and fasten it. 3.3.
3.5.1 Structural acceptance ☆ Whether the reader is firmly fixed and not loose; ☆ Whether the cable is firmly connected; ☆ Whether the screw is tightened. 3.5.2 Performance acceptance ☆ whether reader working properly; ☆ Whether the read/write range is reasonable。 4. Operation Instruction 4.
4.6 Demo software operation All functions can be operated only after successful connection. Double click on the Demo application Please refer to the documentation for all Demo procedures and processes: 4.7. Software 【SingleReaderTest_C#_Software operation instruction_20190822】 Instructions for use: The demo software is only used for configuration parameters and debugging demonstration, not for other commercial purposes. This software is not the final version and will be updated continuously in the future.
3.Connection This software provides two connection modes: serial port (RS232) and network port (RJ45) serial port (RS232): The serial port connection only needs to configure the following parameters 1.
2. click【Connect】 ,A small box will pop up as shown in the figure below 3. Select the correct serial port number, and then select the baud rate【Baud rate is 115200 by default】 (If the parameter has been modified, you need to select the corresponding parameter, otherwise it cannot be connected) 4.
If the display version number is: 1.0.0, the connection fails; Network port (RJ45) The network port connection only needs to configure the following parameters 1. Select in communication【NET(UDP)】 2.
3. 【 Reader IP Add/Port 】 Enter the IP address of the reader, the default is 192.168.0.188, and the port is 4001; 4. 【local IP Add/Port】 Enter local IP address, 【Note: to connect to the network port, you need to change the local IP address to 192.168.0.xxx, the IP address of the same network segment as the device, XXX is between 1-255, and cannot be 188】 5.
4、If you have opened demo before and are still occupying the process, you need to open the process first and close the demo; If you still can't connect successfully, you can contact the corresponding salesman or after-sales technology in time 4.Parameter setting Reader Setup Without reading tag data,click【Setup】,and click【Reader Setup】,As shown in the figure below: click 【GET】 to get the result.
After one inventory, the next inventory will be switched. After all times of inventory, the next antenna inventory will be switched. By default, it must be at least once. Usually, it is enough to set only once.
【SESSION】Default value:S1; 【TARGET】Default value:A; 【TAGFOCUS】Default value:Not checked;As shown in the figure below:: 【Antenna Parameter】 :Select the antenna number corresponding to the hardware, and set the power, power range:21.
Then click【EPC】 After reading the Tags, as shown in the figure below: To stop, click【STOP】
FCC Warning Note: This equipment has been tested and found to comply with the limits for a Class B digital device, pursuant to part 15 of the FCC Rules. These limits are designed to provide reasonable protection against harmful interference in a residential installation. This equipment generates, uses and can radiate radio frequency energy and, if not installed and used in accordance with the instructions, may cause harmful interference to radio communications.
party responsible for compliance could void the user's authority to operate the equipment. In cases where the manual is provided only in a form other than paper, such as on a computer disk or over the Internet, the information required by this section may be included in the manual in that alternative form, provided the user can reasonably be expected to have the capability to access information in that form.