Propane Patio Heaters OPERATOR'S MANUAL MH-0042-PM10 CAUTION RISK OF INJURY! READ ENTIRE MANUAL BEFORE OPERATING! THIS MANUAL IS AN IMPORTANT PART OF THE HEATER AND MUST REMAIN WITH THIS UNIT! 3181069 ©Copyright 2018, Mi-T-M Corporation® Propane Patio Heater Manual 37-1459-E/F/S-120219 1
TABLE OF CONTENTS IMPORTANT SAFETY INSTRUCTIONS...................................................................................................4 PATIO HEATER FEATURES......................................................................................................................8 GENERAL SAFETY INFORMATION.........................................................................................................9 COMPONENTS................................................................................
INTRODUCTION Congratulations on the purchase of your new Mi-T-M® Patio Heater! You can be assured your Mi-T-M® Heater was constructed with the highest level of precision and accuracy. Each component has been rigorously tested by technicians to ensure the quality, endurance and performance of this heater. This operator's manual was compiled for your benefit.
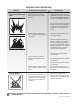
IMPORTANT SAFETY INSTRUCTIONS Hazard RISK OF EXPLOSION OR FIRE Potential Consequence Serious injury may occur if the heater air inlet or outlet is blocked. Prevention Always operate heater in a well ventilated area free of flammable vapors, combustible dust, gases or other combustible materials. Do not insert or allow any foreign objects to enter any ventilation or exhaust opening as this may cause a fire, or damage to the heater. Serious injury or death may occur, if heater is running while operating.
IMPORTANT SAFETY INSTRUCTIONS Hazard RISK TO BREATHING Potential Consequence Serious injury or death could occur from failure to provide proper ventilation according to this manual.. Prevention Carbon monoxide is toxic. Humans can tolerate small amounts of carbon monoxide, and precautions should be taken to provide proper ventilation.. Early signs of carbon monoxide poisoning resemble the flu.
IMPORTANT SAFETY INSTRUCTIONS NEVER USE THE HEATER IN LOCATIONS WHICH CONTAIN PRODUCTS SUCH AS GASOLINE, SOLVENTS, PAINT THINNERS, DUST PARTICLES, VOLATILE OR AIRBORNE COMBUSTIBLES, OR ANY UNKNOWN CHEMICALS. WARNING: IF THE INFORMATION IN THIS MANUAL IS NOT FOLLOWED EXACTLY, A FIRE OR EXPLOSION MAY RESULT CAUSING PROPERTY DAMAGE, PERSONAL INJURY OR LOSS OF LIFE. DO NOT STORE OR USE GASOLINE OR OTHER FLAMMABLE VAPORS AND LIQUIDS IN THE VICINITY OF THIS OR ANY OTHER APPLIANCE.
WARNING THE FOLLOWING PAGES CONTAIN OPERATING AND MAINTENANCE INSTRUCTIONS. DO NOT ATTEMPT TO OPERATE THIS PATIO HEATER UNTIL YOU HAVE READ AND UNDERSTOOD ALL SAFETY PRECAUTIONS AND INSTRUCTIONS LISTED IN THIS MANUAL. INCORRECT OPERATION OF THIS UNIT CAN CAUSE SERIOUS INJURY!! DO NOT ALTER OR MODIFY THIS EQUIPMENT IN ANY MANNER! NEVER LEAVE HEATER UNATTENDED WHILE BURNING OR WHILE CONNECTED TO A POWER SOURCE.
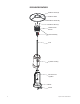
PATIO HEATER FEATURES Reflector Panel (3) Reflector Plate Reflector Assembly Reflector Stud (3) Heater Burner Screen Head Assembly Post Cylinder Housing Gas hose and regulator Base Wheel 8 Propane Patio Heater Manual
GENERAL SAFETY INFORMATION WARNING: IMPROPER INSTALLATION, ADJUSTMENT, ALTERATION, SERVICE OR MAINTENANCE CAN CAUSE INJURY OR PROPERTY DAMAGE. READ THE INSTRUCTIONS THOROUGHLY BEFORE INSTALLING OR SERVICING THIS EQUIPMENT. IMPORTANT: Read this User's Manual carefully and completely before attempting to operate or service this heater.
GENERAL SAFETY INFORMATION 19. Propane gas should be stored or used in compliance with local ordinances and codes or with ANSI/NFPA 58. Turn off propane when not in use. 20. Never leave heater unattended when hot or in use. 21. Keep out of reach of children. 22. Never store propane near high heat, open flames, pilot lights, direct sunlight, other ignition sources or where temperatures exceed 120 degrees F (49°C). 23. Propane vapors are heavier than air and can accumulate in low places.
ASSEMBLY COMPONENTS Remove all components from package. ADDITIONAL REQUIREMENTS The following items are not included, but are necessary for the proper assembly of your heater, DO NOT attempt to assemble without proper tools. Philips screwdriver w/medium blade. Adjustable opening wrench. Leak Detection Solution (Instructions on how to make solution are included in step) Note: You must follow a II steps to properly assemble heater. HARDWARE Description Picture Qty.
ASSEMBLY STEP 2 Attach ground fixtures to Base Option 1: Pre-assembled into base • • • Slide 4 Large bolts through holes of Base. Slide 4 Large nuts through holes under bucket and tighten screws with phillips screw driver. Fill bucket with sand Option 2: If no water tank, go ahead this step. Optional ground fixtures (not available with all models) Mount optional ground fixtures with 6 pcs M6 small bolts and M6 flange nuts into holes on base housing.
ASSEMBLY STEP 3 Attach Post to Cylinder Housing • • Attach the post support on base with 3 M8x16 Bolts. Attached the pole on the top of post support with 6 M6x30 Bolts and nuts. Tighten Bolts and cover with the Cylinder Housing. STEP 4 Attach Reflector Studs to Screen Cover • • • Insert 3 Reflector Studs. Tighten Studs securely. (3) Required Studs STEP 5 Attach Head Assembly to Post • Screw off 4 small bolts.
ASSEMBLY • • • Load Head Assembly by inserting hose into post. Insert Head Assembly into post. Control knob should be above decal on post. • • Attach Head Assembly to post, and loosely install four small bolts. Tighten bolts securely. STEP 6 Install Reflector WARNING: REMOVE PROTECTIVE COVER BEFORE ASSEMBLY. Note: Leave all screws and nuts loose until entire shield is put together to ensure proper alignment. Tighten after sections are aligned. • Slide two reflector panels together.
ASSEMBLY • Attach cap nut and leave loose. • Place reflector center plate into middle of reflector panels and follow same procedure as above. • Repeat procedure to complete the assembly of all four sections. • Fully tighten all of the screws. STEP 7 Attach Reflector Assembly to Studs • • Support Heater. Slide 3 large flat washers over threaded end of studs. (6) Required Large Flat Washers • • (3) Required Wing Nuts Locate Reflector Assembly on 3 studs.
ASSEMBLY STEP 8 Connect Hose & Regulator to Cylinder Specifications • You must provide propane gas and propane cylinder. Use a standard 20 lb. propane cylinder only. • Use this heater only with a propane vapor withdrawal supply system. See Chapter 5 of the Standard for Storage and Handling of Liquefied Petroleum Gas, ANSI/NFPA58. Your local library or fire department should have this book. The minimum permissible gas supply pressure of 10 W.C. is required for purpose of input adjustment.
ASSEMBLY LEAK CHECK WARNING: PERFORM ALL LEAK TESTS OUTDOORS. EXTINGUISH ALL OPEN FLAMES. NEVER LEAK TEST WHEN SMOKING. DO NOT USE THE HEATER UNTIL ALL CONNECTIONS HAVE BEEN LEAK TESTED AND DO NOT LEAK. • Make 2-3 oz. of leak check solution (one part liquid dish-washing detergent and three parts water). • Apply several drops of solution where hose attaches to regulator. • Apply several drops of solution where regulator connects to Cylinder. • Make sure all Patio Heater & Light valves are OFF.
OPERATION DANGER: CARBON MONOXIDE HAZARD FOR OUTDOOR USE ONLY. NEVER USE INSIDE HOUSE, OR OTHER UNVENTILATED OR ENCLOSED AREAS. THIS HEATER CONSUMES AIR (OXYGEN). DO NOT USE IN UNVENTILATED OR ENCLOSED AREAS TO AVOID ENDANGERING YOUR LIFE. CAUTION: DO NOT ATTEMPT TO OPERATE UNTIL YOU HAVE READ & UNDERSTAND ALL GENERAL SAFETY INFORMATION IN THIS MANUAL AND ALL ASSEMBLY IS COMPLETE & LEAK CHECKS HAVE BEEN PERFORMED.
OPERATION 4. Push and release the igniter button until pilot flame is visible through viewing hole. 5. Release control knob after 30-60 seconds. Pilot light will remain lit. If not, return to step 1. 6. Turn control knob to on. Main burner will light immediately. Flame is visible through viewing hole. If not, return to step 1.
OPERATION RE-LIGHTING Note: For your safety, control knob cannot be turned off without first depressing control knob in pilot position and then rotating it to off. • Turn control knob to off. • Wait at least 5 minutes, to let gas dissipate, before attempting to relight pilot. • Repeat the “Lighting” steps. SHUTDOWN • Turn the control knob clockwise to pilot (normally the burner will make a slight popping sound when extinguished). Burner will extinguish but the pilot will remain on.
MAINTENANCE WARNING: FOR YOUR SAFETY DO NOT TOUCH OR MOVE THE HEATER FOR AT LEAST 45 MINUTES AFTER USE. THE REFLECTOR IS HOT TO THE TOUCH, ALLOW THE REFLECTOR TO COOL BEFORE TOUCHING. To enjoy years of outstanding performance from your heater, make sure you perform the following maintenance activities on a regular basis: • • • Keep the exterior surfaces clean. Use stainless steel cleaner for cleaning. Never use flammable or corrosive cleaning agents.
TROUBLESHOOTING PROBLEM CAUSES SOLUTION Cylinder valve is closed Open valve Blockage in orifice or pilot tube Clean or replace orifice or pilot tube Air in gas line Open gas line and bleed it (pressing control knob in) for not more than 1 - 2 minutes or until you smell gas Pilot Won’t Light Note: Heater operates at reduced efficiency below 40°F (6°C) Low gas pressure with cylinder valve fully open Use match to light pilot; obtain new igniter and replace Igniter fails Pilot Won’t Stay Lit Burner
STATEMENT OF WARRANTY Mi-T-M warrants this heater to the original retail purchaser only, to be free from defects in material and workmanship for a period of one (1) year from the date of initial purchase. This product must be properly installed, maintained and operated in accordance with the instructions provided. Mi-T-M requires reasonable proof of your date of purchase from an authorized retailer or distributor.
TABLE OF CONTENTS IMPORTANT!............................................................................................................................................25 IMPORTANTES CONSIGNES DE SECURITE.....................................................................................26 !GARDER CES INSTRUCTIONS!............................................................................................................28 FONCTIONS...........................................................................
INTRODUCTION Félicitations de l'achat de votre nouveau le radiateur! Vous pouvez être assuré que votre nouveau le radiateur a été construit avec le plus haut niveau de précision et de fiabilité. Chaque composant a été rigoureusement testé par des techniciens pour assurer la qualité, la durabilité et la performance de le radiateur. Ce manuel opérateur a été dressé pour que vous en retiriez le meilleur parti.
IMPORTANTES CONSIGNES DE SECURITE Hazard Potential Consequence RISQUE D'EXPLOSION OU D'INCENDIE Des blessures graves peuvent survenir si la prise ou la sortie d’air du chauffage est obstruée. Prevention N’utiliser ce chauffage que dans un endroit bien ventilé libre de vapeurs inflammables, de poussière combustible ou de toute autre matière combustible.
IMPORTANTES CONSIGNES DE SECURITE Hazard Potential Consequence RISQUE DE PROBLEME RESPIRATOIRE Propane Patio Heater Manual Des blessures graves, voire la mort peuvent survenir si une bonne ventilation n’est pas fournie selon les consignes de ce manuel. Prevention L’oxyde de carbone est toxique. Les humains peuvent tolérer de petites quantités d’oxyde de carbone et des précautions doivent être prises pour fournir une ventilation appropriée.
IMPORTANTES CONSIGNES DE SECURITE NE JAMAIS UTILISER LE RADIATEUR DANS DES ENDROITS QUI CONTIENNENT OU POURRAIENT CONTENIR DES MATIÈRES COMBUSTIBLES VOLATILES OU EN SUSPENSION DANS L’AIR, OU ENCORE DES PRODUITS COMME L’ESSENCE, LES SOLVANTS, LES DILUANTS À PEINTURE, LES PARTICULES DE POUSSIÈRE OU DES PRODUITS CHIMIQUES INCONNUS.
AVERTISSEMENT LES PAGES SUIVANTES CONTIENNENT LES CONSIGNES D'UTILISATION ET D'ENTRETIEN. NE TENTER PAS DE FAIRE FONCTIONNER CE COMPRESSEUR D'AIR AVANT D'AVOIR LU ET COMPRIS TOUTES LES PRECAUTIONS ET CONSIGNES DE SECURITE CONTENUES DANS CE MANUEL.
FONCTIONS Panneau réflecteur (3) Plaque réfléchissante Ensemble réflecteur Goujon de réflecteur (3) Écran du brûleur Assemblage de tête Tige Couverclede labouteille Tuyau de gaz et régulateur Base Roue 30 Propane Patio Heater Manual
INFORMATIONS GÉNÉRALES SUR LA SÉCURITÉ L’UTILISATION INAPPROPRIÉE DE CE RADIATEUR PEUT CAUSER DES BLESSURES GRAVES OU MORTELLES SUITE À DES BRÛLURES, UN INCENDIE, UNE EXPLOSION, UNE DÉCHARGE ÉLECTRIQUE ET/OU UN EMPOISONNEMENT AU MONOXYDE DE CARBONE. IMPORTANT: Ne pas utiliser ce radiateur avant d’avoir lu et entièrement compris ces directives de sécurité et d’utilisation.
INFORMATIONS GÉNÉRALES SUR LA SÉCURITÉ 17. Ce produit est alimenté par du gaz propane. Le gaz propane est invisible, inodore, et inflammable. Une substance odorante est généralement ajoutée au propane pour lui donner une odeur « d'œuf pourri » et faciliter la détection des fuites. La substance odorante peut s'atténuer au fil du temps rendant la détection de fuite par l'odeur plus difficile. 18. Le gaz propane est plus lourd que l'air et en cas de fuite, il se déposera au niveau du sol.
INSTRUCTIONS D’ASSEMBLAGE COMPOSANTS Retirez tous les composants de l'emballage. RENSEIGNEMENTS SUPPLÉMENTAIRES Les articles suivants ne sont pas inclus, mais sont nécessaires au bon assemblage de votre appareil de chauffage. N'essayez PAS d'assembler sans les outils appropriés. Tournevis Phillips avec tête moyenne Clé à molette.
INSTRUCTIONS D’ASSEMBLAGE ÉTAPE 2 Attachez les fixations au sol à la base Option 1: Pré-assemblées dans la base • • • Faites glisser 4 gros boulons à travers les orifices de la base. Faites glisser 4 gros boulons à travers les orifices qui se trouvent en-dessous du seau et serrez les vis à l'aide d'un tournevis Phillips. Remplissez le seau de sable 4 grosses vis requises 4 gros écrous requis Option 2: S'il n'y a pas de réservoir d'eau, passez directement à l'étape suivante.
INSTRUCTIONS D’ASSEMBLAGE ÉTAPE 3 Fixez le poteau au logement de cylindre • • Fixez le support de poteau sur la base avec 3 boulons M8x16. Fixé le poteau sur le dessus du support de poteau avec 6 boulons M6x30 et écrous. Serrer les boulons et le couvercle avec le logement de cylind ÉTAPE 4 Fixez les goujons du réflecteur au protecteur d'écran • • • Insérez les 3 goujons du réflecteur. Serrez solidement les goujons.
INSTRUCTIONS D’ASSEMBLAGE • • • Chargez l'ensemble de la tête en insérant un tuyau dans le poteau. Insérez l'ensemble de la tête dans le poteau. Le bouton de commande devrait être situéau-dessus de l'autocollant sur le poteau. • • Fixez l'ensemble de la tête au poteau et installez quatre petits boulons sans les serrer. Serrez fermement les boulons. ÉTAPE 6 Installez le réflecteur AVERTISSEMENT : RETIREZ LA HOUSSE DE PROTECTION AVANT L'ASSEMBLAGE.
INSTRUCTIONS D’ASSEMBLAGE • Fixez l'écrou-capuchon sans le serrer. • Placez la plaque centrale du réflecteur au centre des panneaux du réflecteur et suivez la même procédure que celle indiquée ci-dessus. • Répétez la procédure pour terminer l'assemblage des quatre sections. • Serrez fermement toutes les vis ÉTAPE 7 Fixez l'ensemble du réflecteur aux goujons • • Soutenez l'appareil de chauffage. Glissez 3 grandes rondelles plates par-dessus l’extrémité filetée des goujons.
INSTRUCTIONS D’ASSEMBLAGE ÉTAPE 8 Attachez le tuyau et régulateur à la bouteille Spécifications • Vous devez fournir du gaz propane et une bouteille de propane. Utilisez uniquement une bouteille de propane régulière de 9 kg (20 lb). • Utilisez cet appareil de chauffage uniquement avec un système d'alimentation à soutirage de vapeur de propane. Voir le chapitre 5 de la norme pour l'entreposage et la manipulation du gaz de pétrole liquéfié, ANSI / NFPA 58.
INSTRUCTIONS D’ASSEMBLAGE DÉTECTION DE FUITES AVERTISSEMENT: EFFECTUER TOUS LES ESSAIS DE FUITE À L'EXTÉRIEUR. ÉTEINDRE TOUTES LES FLAMMES OUVERTES. N'EFFECTUEZ JAMAIS DE TEST DE FUITES LORSQUE VOUS FUMEZ. N'UTILISEZ PAS CET APPAREIL DE CHAUFFAGE AVANT D'ÊTRE SÛR QUE TOUS LES RACCORDS ONT ÉTÉ VÉRIFIÉS ET QU'IL N'Y A PAS DE FUITES. • Préparez 60 à 88 ml (2 à 3 oz) de solution pour détecter les fuites (une part de liquide à vaisselle et trois parts d'eau).
FONCTIONNEMENT DANGER: DANGER D'INTOXICATION AU MONOXYDE DE CARBONE. UTILISER UNIQUEMENT À L'EXTÉRIEUR. N'UTILISEZ JAMAIS À L'INTÉRIEUR DE LA MAISON OU DANS D'AUTRES ESPACES CLOS OU NON VENTILÉS. CET APPAREIL DE CHAUFFAGE CONSOMME DE L'AIR (OXYGÈNE). N'UTILISEZ PAS DANS DES ESPACES CLOS OU NON VENTILÉS POUR ÉVITER DE METTRE VOTRE VIE EN DANGER.
FONCTIONNEMENT ALLUMAGE Remarque: Cet appareil de chauffage est équipé d'une lumière de veilleuse qui permet un démarrage et un arrêt plus sécuritaires. La veilleuse doit être allumée avant que le brûleur principal ne puisse être démarré. 1. Tournez la vanne de la bouteille à ON. 2. Ouvrez l'orifice d'observation en faisant glisser le couvercle d'un côté ou de l'autre. 3.
FONCTIONNEMENT ne devraient pas produire une fumée noire dense, ceci indique que le conduit d'air qui circule à travers le brûleur est obstrué. La flamme devrait être bleue, droite et jaune au bout. Si la présence d'une flamme jaune excessive est décelée, fermez le chauffage et consultez la section « dépannage » du présent manuel.
FONCTIONNEMENT • Les enfants et adultes se trouvant dans les environs ont été informés des dangers de température élevée : en particulier du risque de brûlure ou que leurs vêtements prennent feu. • Les enfants et adultes se trouvant dans les environs ont été avertis de ne pas toucher l'appareil de chauffage près du moteur en cours de fonctionnement et avant que l'unité ne se soit entièrement refroidie. APRÈS L'UTILISATION • • • • Le contrôle du gaz est en position OFF.
ENTRETIEN AVERTISSEMENT POUR VOTRE SÉCURITÉ NE TOUCHEZ PAS OU NE DÉPLACEZ PAS LE CHAUFFAGE PENDANT AU MOINS 45 MINUTES APRÈS L'UTILISATION. LE RÉFLECTEUR EST CHAUD AU TOUCHER, LAISSEZ LE RÉFLECTEUR SE REFROIDIR AVANT DE LE MANIPULER. Pour profiter des années de performance exceptionnelle de votre appareil de chauffage, assurez-vous d'effectuer régulièrement les activités de maintenance suivantes : Gardez les surfaces extérieures propres. • Utilisez un nettoyant pour acier inoxydable pour nettoyer.
DÉPANNAGE SYMPTÔME La veilleuse ne s'allume pas Remarque: Le chauffage fonctionne à un rendement réduit en dessous de 40° C (6° F).
GARANTIE LIMITÉE Mi-T-M garantit à l’acheteur au détail d’origine seulement que ce radiateur sera exempt de défauts de matière et de fabrication pendant une période d’un an à partir de la date de l’achat initial. Ce produit doit être installé, entretenu et utilisé correctement, en conformité avec les instructions fournies. Mi-T-M exige une preuve raisonnable de la date d’achat chez un détaillant ou un distributeur autorisé.
Propane Patio Heater Manual 47
Propane Patio Heater Manual