
Iota V2.03 - Specifications
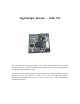


• PPM output connector
o Connect you trainee cable (not provided) like this: center tap of the audio jack
or data pin to the X axis data pin (blue square on the image) and ground to the
outer ring. Please refer to your remote control manual.
NOTE: To show that the module is in PPM mode, the LED will blink four times at start-up and
after will have a heartbeat speed of about one seconds.
Reverse the stroke of the servos
No matter which mode is used you can reverse the direction of servo’s rotation for each axis by
shortcutting (soldering) the reverse axis jumpers located under the PCB.
Center button
Press the Center button anytime to center the horizontal (X axis) servo to the middle of its
stroke.
Factory reset
To reset PPM stroke calibration data to factory default, turn on the Iota V2 module. After that,
press and hold Center button for about 8 seconds. The LED will blink shortly three times. The
data is now erased.
Note: The Gyroscope Sensor - Iota V2 can take up to 20 seconds to stabilize the X axis after
power on.
You need to use the Gyroscope Sensor - Iota V2 in your Arduino project?
No problem, just powering the module and configure it in servos mode and then, connect the
three axis pins to three analog pins of your Arduino (and one ground) and use the “analogRead”
function. Have fun!