Operating Instructions NewClassic Balances ML Models C C C C C C
Table of contents 1 7 Introduction 1.1 7 Conventions and Symbols Used in These Operating Instructions 2 Safety Precautions 8 3 Overview 9 3.1 3.2 3.
11 Application "Formulation" (Net Total Formulation) 47 12 Application "Totaling" 49 13 Application "Dynamic Weighing" 51 14 Application "Multiplication Factor Weighing" 53 15 Application "Division Factor Weighing" 55 16 Application "Density" 57 16.1 16.2 16.3 57 59 60 17 Application "Routine Test" 63 18 Application "Diagnostics" 66 18.1 18.2 18.3 18.4 18.5 18.6 18.7 18.8 19 20 Function PC-Direct 66 67 68 69 69 70 71 72 73 73 75 Firmware (Software) Updates 20.1 20.
24.3.1 24.3.2 24.3.3 24.3.4 24.3.5 24.3.6 25 Accessories Spare Parts Index 92 93 94 97 100 Appendix 26.1 27 88 89 90 91 94 Accessories and Spare Parts 25.1 25.2 26 Balances with Readability of 0.1 mg with Draft Shield (235 mm) Balances with Readability of 1 mg with Draft Shield (235 mm) Balances with Readability of 1 mg with "Flex" Draft Shield (105 mm) Balances with Readability of 0.01 g with Square Weighing Pan and Draft Shield Element Balances with Readability of 0.01 g / 0.
1 Introduction Thank you for choosing a METTLER TOLEDO balance. The precision balances of the NewClassic line combine a large number of weighing possibilities with easy operation. These operating instructions apply to all balance models ML in the NewClassic line. However, the different models have different charcteristics regarding equipment and performance. Special notes in the text indicate where this makes a difference to operation. 1.
2 Safety Precautions Always operate and use your balance only in accordance with the instructions contained in this manual. The instructions for setting up your new balance must be strictly observed. If the balance is not used according to these Operating Instructions, protection of the balance may be impaired and METTLER TOLEDO assumes no liability. It is not permitted to use the balance in explosive atmosphere of gases, steam, fog, dust and flammable dust (hazardous environments).
3 Overview 3.1 Components C C 0.1 mg 1 mg C 0.
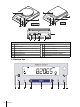
C C 0.1 g 0.01g / 0.1g 14 10 11 13 12 Name and Function of Components 1 2 3 4 5 6 7 Display Operation keys Model sticker (with approved models only) Level indicator Weighing pan Draft shield element Leveling foot 8 9 10 11 12 13 14 Glass draftshield Handle for operation of the draft-shield door Socket for AC Adapter RS232C serial interface Kensington slot for anti-theft purposes Slot for second interface (optional) Product label 3.
Key Functions No. Key Press briefly (less than 1.5 s) Press and hold (longer than 1.
Application Icons Menu locked Application “Formulation / Net-Total” Menu setting activated Application “Totaling” Application "Weighing" Application “Dynamic weighing” Application "Piece counting" Application “Multiplication factor” Application "Percent weighing" Application “Division factor” Application "Check weighing" Application “Density” Application "Statistics" Status Icons Indicates stored value (Memory) Acoustic feedback for pressed keys activated Indicates Net weight values Weighing
4 Setting up the Balance The balance must be disconnected from the power supply when carrying out all setup and mounting work. 4.1 Unpacking and Delivery Inspection a) Open the packaging and carefully remove all components. b) Check the delivered items. The standard scope of delivery contains the following items: Components Balances with round weighing pan 0.
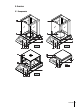
4.2 Installing the Components 5 4 3 2 1 Balances with readability of 0.1 mg, with draft shield (235 mm) Place the following components on the balance in the specified order: Note: Push the side glass door (1) back as far as will go.
Balances with readability of 1 mg, with flex draft shield (105 mm) 6 5 Place the following components on the balance in the specified order: 4 a) Place bottom plate (1) (push and turn) 3 b) Place pan support (2) with weighing pan (3). 2 c) Unfold the draft shield frame (4) and place it cor rectly. 1 d) Insert the glass panels (5) into the draft shield frame.
Balances with readability of 0.1 g with square weighing pan 2 1 Place the following components on the balance in the specified order: ● Pan support (1) ● Weighing pan (2) C 4.3 Selecting the Location and Leveling the Balance Your balance is a precision instrument and will thank you for an optimum location with high accuracy and dependability. 4.3.1 Selecting the Location Select a stable, vibration-free position that is as horizontal as possible.
Balances with 4 leveling feet a) First turn the two rear leveling feet all the way in. b) Adjust the two front leveling feet as previously described. c) Turn the rear leveling feet down onto the surface for extra stabiliz ing safety, so the balance cannot tilt over under eccentric loads. 4.4 Power Supply Allow your balance to warm up for 30 minutes (0.1 mg models 60 minutes) to enable it to adapt itself to the ambient conditions. 4.4.
battery fully 2/3 full When the balance is operating on its batteries, the battery symbol in the display lights up. The number of segments that are lit is an indica tor of battery condition (3 = fully charged, 0 = discharged). When the batteries are almost completely discharged, the battery symbol flashes. 1/3 full battery empty Inserting / Replacing Batteries The balance must be disconnected from the power supply when carrying out all setup and mounting work.
Transporting Over Short Distances For balances with a draft shield: Observe the following instructions to transport your bal ance over a short distance to a new location: Never lift the balance using the glass draft shield. The draft shield is not sufficiently fastened to the balance. Transporting Over Long Distances If you would like to transport or send your balance over long distances, use the complete original packaging. 4.
Requirement: To carry out this operation, in the menu topic "CAL" (Adjustment) of advanced menu "ADJ.INT" must be selected. ADJ.INT a) Unload weighing pan ------ b) Press and hold « » to execute "Internal Adjustment". ADJ.DONE 0. 00 The balance adjusts itself automatically. The adjusting is finished when the message "ADJ.DONE" appears briefly on the display. The balance returns to the last active application and is ready for operation.
Sample adjustment printout using external weight: - External Adjustment -21.Jan 2009 12:56 METTLER TOLEDO Balance Type SNR ML4002 1234567890 Temperature Nominal Actual Diff 22.5 °C 2000.00 g 1999.99 g 5 ppm Adjustment done Signature .......................
5 Weighing Made Simple This section shows you how to perform simple weighings and how you can accelerate the weighing process. 5.1 Switching the Balance On and Off This section shows you how to perform simple weighings and how you can accelerate the weighing process. Switching On On a) Remove any load from weighing pan. Off b) Press «On». 8888888 XXXXXXX 0.
5.2 Performing a Simple Weighing # C a) Press « » to zero the balance. Note: If your balance is not in the weighing mode, first press and hold the « » key until “WEIGH“ appears in the display. Release the key. Your balance is in the weighing mode. 0.00 g 0.00 g 1182.03 g c) Wait until the instability detector " " disappears and the stability beep sounds. 1250.38 g d) Read the result. b) Place weighing sample on the weighing pan. 5.3 Zero Setting / Taring Zero setting a) Unload the balance.
5.5 Recall / Recall Weight Value Recall stores stable weights with an absolute display value bigger than 10d. Requirement: The function "RECALL" must be activated in the menu. 0. 00 C g 121. 01 g 0. 00 g C 121. 01 M g 0. 00 a) Load weighing sample. The display shows weight value and stores stable value. b) Remove weighing sample. When the weight is removed the Dis play shows zero. ».
6 The Menu 6.1 What is in the Menu ? The Menu allows you to match your balance to your specific weighing needs. In the menu you can change the settings of your balance and activate functions. The main menu has 4 different menus and these contains 35 different topics, each of which allows you various selection possibilities. For Menu "PROTECT" see chapter "Description of menu topics" section "Main menu". Note: See Quick Guide for the graphical overview of the menu (Menu Map) with all setting possibilities.
Topic Description RS E.O.L. RS.CHAR INTERVL. Setting the end of line format of the serial interface RS232C. Setting the char set of the serial interface RS232C. Selection of the time interval for the simulated print key press. 6.2 Menu Operation In this Section you will learn how to work with the menu. Select Menu 406.2 g BASIC ADVANCE a) Press and hold « » to activate main menu. The first menu "BASIC" is displayed (except menu protection is active).
Saving Settings and Closing the Menu a) Press and hold « » to leave menu topic. SAVE:YES b) Press « SAVE:NO c) Press « » to execute "SAVE:NO". Changes are not saved. To tog gle between "SAVE:YES" and "SAVE:NO" press « ». » to execute "SAVE:YES". Changes are saved. Cancel For leaving menu topic or menu selection without saving press «C» (one step back in the menu). Note: If no entry is made within 30 seconds, the balance reverts to last active application mode. Changes are not saved.
Note: A reset of the balance will not change this setting. "UNIT 1" – Weight Unit 1 Depending on requirements, the balance can operate with the following units (depending on the model) ● Only those weight units allowed by the appropriate national legislation are selectable. ● With approved balances, this menu topic has a fixed setting and cannot be changed. ● Conversion table for weight units see chapter Appendix.
"RESET" – Reset Balance Settings This menu topic allows you to cal-up the factory settings. To toggle between "YES?" and "NO?" press « » (or «+» or «–»). Note: A reset of the balance will not change the "DATE" and "TIME" settings. 6.3.3 Advanced Menu "ENVIRON." – Environment Settings This setting can be used to match your balance to the ambient conditions. "STD." Setting for an average working environment subject to moderate variations in the ambient conditions. (Factory setting) "UNSTAB.
"TIME.FRM" – Time Format This menu topic allows you to preselect the time format. The following date formats are available: Display examples "24:MM" 15:04 "12:MM" 3:04 PM "24.MM" 15.04 "12.MM" 3.04 PM Factory setting: "24:MM" "RECALL" – Recall This menu topic allows you to switch the "RECALL" function on or off. When it is switched on recall stores the last stable weight if the absolute display value was bigger than 10d.
"B.L. OFF" Backlight is always off. "B.L. 30" " Automatic switch-off after 30 seconds inactivity. "B.L. 1' " Automatic switch-off after 1 minute inactivity. "B.L. 2' " Automatic switch-off after 2 minutes inactivity. "B.L. 5' " Automatic switch-off after 5 minutes inactivity. "A.ZERO" – Automatic Zero Setting This menu topic allows you to switch the automatic zero setting on or off. “ON“ "A.ZERO" switched on (factory setting).
"REPEAT.T" Repeatability test (models with internal weights only) "DISPLAY" Display test "KEYPAD.T" Key test "CAL.MOT.T" Motor test (models with internal weights only) "BAL.HIST" Balance history "CAL.HIST" Calibration history "BAL.INFO" Balance information "SRV.PROV" Service provider information "SRV.ICON" – Service Reminder This menu topic allows you to switch the service reminder " " on or off. "ON" Service reminder " " switched on.
"HOST" Connection to a PC, Barcode Reader etc.: the balance can send data to the PC and receive commands or data from the PC. Note: The balance sends the complete MT-SICS answer to the PC (see chapter "MT-SICS Interface Commands and Functions". "SND.OFF" Send mode switched off.(Factory setting) "SND.STB" If the « sent. » key is pressed, the next stable weight value will be "SND.CONT" All weight value updates will be sent regardless of stability, with out pressing the « » key. "SND.
"LN.FEED" – Options for Complete the Printout of individual values This menu topic allows you to specify the number of blank lines to complete the printout (line feed) for every individual weighing result (after pressing « ») . Note: This menu topic is only available if “PRINTER” setting was selected. "0" Possible numbers of blank lines: 0 to 99 (Factory setting = 0) "ZERO.PRT" – Options for “PRT.AUTO” 1) This menu topic allows you to specify the auto print function “PRT.
W Calibration/adjustment (depending on the menu setting) *) Z Internal calibration/adjustment **) f0_ Function key (F) f1_ Function key (CAL) s3_ C key x0_ Perform internal calibration **) x1_ Print balance/scale model x2_ Print weighing cell serial number x3_ Print software version *) may be inaccessible on verified balances/scales **) only on models with built-in motorized calibration weight Functionality mapping "HOST" settings: Sartorius printer settings: "SND.
"STOPBIT" – Stop Bits RS232C 1) At this menu topic you can set the stop bits of the transmitted data to different RS232C serial receivers. "1 BIT" 1 Stop bit (Factory setting) "2 BITS" 2 Stop bits Note: ● Not visible for 2nd display. ● Each device has separate settings. "HD.SHK" – Handshake RS232C 1) This menu topic allows you to match the data transmission to different RS232C serial receivers. "XON.XOFF" Software handshake (XON/XOFF) (Factory setting) "RTS.
——————————————————————————— 1) Note for 2nd RS232C Interface ● If an optional 2nd interface is installed, the menu topic is dis played for each interface, e.g "BAUD.1" for standard interface "BAUD.2" for optional 2nd interface ● Only one printer can be set if two RS232 interfaces are existing.
7 Application "Piece Counting" The "Piece Counting" application allows you to determine the number of pieces put on the weighing pan. Requirement: The function "COUNT" must be assigned to the «F» key (see advanced menu topic "ASSIGN:F", factory setting). Activate function "COUNT" by pressing and holding the «F» key. COUNT Piece Counting first requires the setting of a reference weight, there are 4 possibilities: A B C D Setting the reference by multiple pieces with fix reference values.
Setting possibility C C PCS.WGT Setting the reference for one piece in weighing mode a) Select "PCS.WGT" by scrolling with « ». b) Press « » to tare. If needed: place empty container on the weighing pan and tare again. 0. 00 g 2. 74 g 1 c) Add one reference piece to container. The weight of one piece is displayed. C d) Press « ------ » to confirm. Note: With approved balances, this setting is not available in selected countries. 1 PCS Setting possibility D D PCS.
8 Application "Percent Weighing" The "Percent Weighing" application allows you to check a sample weight as percentage to a reference target weight. Requirement: The function "PERCENT" must be assigned to the «F» key (see advanced menu topic "ASSIGN:F". Activate function percent weighing "PERCENT" by pressing and holding the «F» key.
Switching between percent and weight display , 73.17% 128.25 128.25 128250 g M g You can use the « » key at any time to switch the display between percent display, weighing unit "UNIT 1", "RECALL" value (if activated) and weighing unit "UNIT 2" (if different from UNIT 1). Note: ● The recall value is displayed with an asterisk (*) as well as icon "M" and can not be printed. ● The current set weight remains stored until it is redetermined.
9 Application "Check Weighing" The "Check weighing" application allows you to check the deviation of a sample weight within a tolerance limit to a reference target weight. Requirement: The function "CHECK" must be assigned to the «F» key (see advanced menu topic "ASSIGN:F". Activate function "CHECK" by pressing and holding the «F» key.
2A Step 2, setting possibility: SET.T+/- % 2. 50 % 20. 28 g 2A Setting the upper and lower limits (in percentage): a) Press « » to start setting. b) Press « » to confirm the default limit of +/- 2.5 % or enter the limit value by scrolling up («+» key) or down («–» key). Press « » to confirm the limits. Note: Press « » to switch between "UNIT 1" and Unit "%". Step 2, setting possibility: 2B SET T+/- % 2B Setting the upper and lower limits by weight: 2. 50 a) Press « » to start setting.
20.15 Weighing-in-Aid g The Weighing-in-Aid helps you quickly determine the position of the sample weight regarding the tolerance.
10 Application "Statistics" The "Statistics" application allows you to generate statistics of weighing values. 1 to 999 values are possible. Requirement: The function "STAT." must be assigned to the «F» key (see advanced menu topic "ASSIGN:F"). Connect a printer or a PC if present. a) Activate function "STAT." by pressing and holding the «F» key. STAT b) To continue the last statistics press « ». For a new statistical evaluation press « » (or «+», «–») to select "CLR.
sum of all values Printout: ------ Statistics -----21.Jan 2009 12:56 METTLER TOLEDO Balance Type ML4002 SNR 1234567890 -----------------------1 46.36 g 2 55.81 g 3 47.49 g 4 53.28 g 5 49.71 g n 5 x 50.530 g s dev 3.961 g s rel 7.84 g Min. 46.36 g Max. 55.81 g Diff 9.45 g Sum 252.65 g ----------------------- 46 Application "Statistics" SUM 252.
11 Application "Formulation" (Net Total Formulation) The "Formulation" (Net Total) application allows you to ● weigh in (add and store) up to 999 individual component weights and displays the total. If a printer is connected, the component weights are printed individually and as a total. ● tare/pre-tare and store up to 999 container weights and displays the total. If a printer is connected, the tare weights are printed out individually and as a total. Requirement: The function "FORMULA.
a) Press « » to show the next statistical value. b) Press «C» to cancel displaying results and to continue weigh ing next component. Printout: ------ Formulation ----21.Jan 2009 12:56 METTLER TOLEDO Balance Type ML4002 SNR 1234567890 -----------------------1 T 10.33 g 1 N 8.85 g 2 N 9.23 g 2 T 10.84 g 3 N 7.43 g . . n 8 T Total 452.76 g G Total 546.79 g N Total 94.
12 Application "Totaling" The "TOTALING" application allows you to weigh in different samples to add their weight val ues and to totalize them. 1 to 999 samples are possible. Requirement: The function "TOTAL" must be assigned to the «F» key (see advanced menu topic "ASSIGN:F"). a) Activate function "TOTAL" by pressing and holding the «F» key. TOTAL b) For a new totaling evaluation press « » (or «+» or «–») to enter "CLR.M:YES" and press « » to clear the memory.
Printout: ------- Totaling ------21.Jan 2009 12:56 METTLER TOLEDO Balance Type ML1602 SNR 1234567890 -----------------------1 46.36 g 2 55.81 g 3 47.49 g 4 53.28 g 5 49.71 g 6 53.93 g . . . n 879 Total 8789.
13 Application "Dynamic Weighing" The "Dynamic Weighing" application allows you to determine the weights of unstable sam ples or to determine weights under unstable ambient conditions. The balance calculates the weight as the average of a number of weighing operations over a defined time. Requirement: The function "DYNAMIC" must be assigned to the «F» key (see advanced menu topic "ASSIGN:F"). Note: "Switching Units" and "RECALL" Functions are not available in this Application.
a) Press « M.START » to zero if needed. b) If using a container: place empty container on weighing pan and press « » to tare the balance. c) Load sample weight. C 13.39 TIME: g d) – If you have selected function "Manual Start" "M.START", press « » to start the weighing. – If you have selected function "Auto Start" "A.START", the weigh ing starts automatically on relative stability. For weighing samples below 5 g the weighing must be started manually by pressing « ». e) Read off result.
14 Application "Multiplication Factor Weighing" The "Multiplication Factor Weighing" application allows you to multiply the weight value (in grams) by a predefined factor (result = factor * weight) and have it calculated to a predefined number of decimal places. Requirement: The function "FACTOR.M" must be assigned to the «F» key (see advanced menu topic "ASSIGN:F"). Activate function "FACTOR.M" by pressing and holding the «F» key. FACTOR.M SET.F.
Weighing procedure 0 a) Press « » to zero/tare. b) Load sample weight on weighing pan. C 9810 1000.02 g c) Read the result. The appropriate calculation is then made using the weight of sample and the selected factor, the result being dis played with the selected display step. Note: No units are displayed. d) Unload sample weight.
15 Application "Division Factor Weighing" The "Division Factor Weighing" divide a predefined factor by the weight value (in grams) (result = factor / weight) and have it rounded to a predefined number of decimal places. Requirement: The function "FACTOR.D" must be assigned to the «F» key (see advanced menu topic "ASSIGN:F"). Activate function "FACTOR.D" by pressing and holding the «F» key. FACTOR.D SET.F.DIV 001.0000 1 Setting the Factor Value: a) Press « » to execute "SET.F.DIV".
Weighing procedure 0.000 a) Press « » to zero/tare. b) Load sample weight on weighing pan. C 0.010 1000.02 C g c) Read the result. The appropriate calculation is then made using the weight of sample and the selected factor, the result being dis played with the selected display step. Note:No units are displayed. To avoid a division by zero, the fac tor division is not calculated at zero. d) Unload sample weight.
16 Application "Density" The "Density" application allows you to determine the density of solid bodies and liquids. Determination of the density uses Archimedes' principle according to which a body immersed in a fluid undergoes an apparent loss in weight which is equal to the weight of the fluid it displaces. To determine the density of solid bodies, we recommended you to work with the optional density kit which contains all the attachements and aids needed for convenient and precise density determination.
If you have selected water or ethanol as the auxiliary liquid: 20.0 21.8 a) Enter the current temperature of the auxiliary liquid (read off on thermometer). Change the value by scrolling up «+» or down «-». The temperature ranges from 10 °C to 30.9 °C. b) Press « » to confirm the value. Note: The densities of distilled water and ethanol in the range 10 °C to 30.9 °C are stored in the balance. If you have selected a freely definable auxiliary liquid: 01.
Sample printout: ---- Density Solid ----18.Mar 2010 20:14 Balance Type ML204 SNR 1234567890 -----------------------ID: ................ Liquid: H-2-O 0.99822 Temp. 20.0 Weight in air: 60.0020 Weight in liquid: 49.9997 Volume of solid: 1.625 Density: g/cm3 °C g g cm3 5.988 g/cm3 =========== Signature ........................ ------------------------ 16.2 Density Determination of Liquids Requirement: The method "LIQUID" is set. Setting the displacement volume of your sinker 010.0000 012.
WEIGH IN LIQUID The balance prompts you to weigh the sinker in the liquid "WEIGH IN LIQUID". a) Pour the liquid into the beaker. Make sure that the sinker is immersed by al least 1 cm in the liquid, and that there are no air bubbles in the container. b) Press « * 1.000 » to initiate the measurement. The balance now shows the determined density of the liquid at the cur rent temperature (read off on the thermometer). Note: ● This result has already been corrected for the air buoyancy.
A = Weight of the sample in air B = Weight of the sample in the auxiliary liquid V = Volume of the sample = Density of the auxiliary liquid = Density of Air (0.0012 g/cm3) = Weight correction factor (0.99985), to take the atmospheric buoyancy of the adjustment weight into account Formula for determining the density of liquids with compensation for air density = Density of the liquid P = Weight of the displaced liquid V = Volume of the sinker = Density of air (0.
Density Table for Ethanol Density of C2H5OH according to the "American Institute of Physics Handbook".
17 Application "Routine Test" The "Routine Test" application allows you to determine the sensitivity of the balance. More about periodic sensitivity tests (routine tests) see: GWP® (Good Weighing Practice) on www.mt.com/gwp. GWP gives clear recommendation for routine testing: ● how should I test my balance? ● how often? ● where can I reduce efforts? More about test weights see www.mt.com/weights. Requirement: ● The function "R.TEST" must be assigned to «F» key (see advanced menu topic "ASSIGN:F").
WARN. LMT 1.25 g Setting the Warning Limit The default value of the warning limit: Warning limit = control limit / safety factor Example: 2.5 g / 2 = 1.25 g. a) For changing the value, press «+» to scroll up or «–» to scroll down. Progressing speed by press and hold. b) Press « » to confirm the value. Note: The default values of control limit and the warning limit are evaluated according the GWP recommenda tion. These are based under the assumption that the weighing process tolerance is 0.
Content of SOP: ● Preparation ● Test procedure ● Evaluation ● Deviation • If Warning Limit "FAILED" • If Control Limit "FAILED" Application "Routine Test" 65
18 Application "Diagnostics" The "Diagnostics" application allows you to carry out predefined diagnostics tests and to view or print predefined sets of balance information. This diagnostics tool helps you find errors faster and more efficiently. Requirement: A printer or a PC is connected to the balance for showing the results. a) Activate "ADVANCE." menu. (See section menu operation) b) Activate function "DIAGNOS." by pressing « c) Use « ». » to select appropriate tests. 18.
Sample Printout: -- Repeatability Test -21.Jan 2009 11:34 METTLER TOLEDO Balance Type ML4002 SNR 1234567890 SW V1.00 Temperature 21.3 °C No. of tests 10 -----------------------1. Time 00:00:00 1. Temp 21.3 °C 2. Time 00:00:04 2. Temp 21.3 °C . . . -----------------------s Dev 0.004 g Max Temp 21.3 °C Min Temp 21.3 °C Mean Temp 21.3 °C Total Time 00:00:44 ------------------------ Examples: Repeatability test is a tool to do functional check with the balance.
Sample Printout: ----- Display Test ----21.Jan 2009 11:34 METTLER TOLEDO Balance Type ML204 SNR 1234567890 SW V1.00 Display Test DONE ------------------------ 18.3 Key Test The key test allows you to test the keys of the balance. a) Press « » to start "KEYPAD.T". b) The message "KEY TEST - PRESS KEY TO BE TESTED" is displayed scrolling during the duration of the key test. Press every Key briefly. Each press of a key beeps and echoes with "OK” on the display.
18.4 Motor Test The motor test allows you to test the calibration motor of the balance. Note: On models with internal weight only. a) Press « » to start "CAL.MOT.T". "RUNNING" is displayed during the Motor Test. A motor test is deemed successful when all the motor posi tions have been successfully tested. At the end of the test, the test information will be printed. b) Press « » for printout. c) Press «C» to cancel the test procedure. The balance will return to the topic "DIAGNOS.".
Sample Printout: --- Statistical Info --21.Jan 2009 11:34 METTLER TOLEDO Balance Type ML4002 SNR 1234567890 SW V1.00 -----------------------Operating time 18d 23h Total weight loaded 115.7191 kg Number of weighings 1255 Number of key presses 4931 Motor movements 1012 Backlight operating time 18d 4h Next service due date 01.01.2010 ------------------------ 18.6 Calibration History The "Calibration History" function allows you to view and print information of the last 30 (thirty) balance adjust ment.
Sample Printout: ----- Calibration -----05.Mar 2010 11:34 METTLER TOLEDO Balance Type ML204 SNR 1234567890 -----------------------01 05.Mar 2010 11:34 External ADJ SERVICE 23.5°C Diff -3ppm -----------------------02 04.Mar 2010 09:00 Internal ADJ 22.4°C Diff 2ppm -----------------------. . . 28 03.Mar 2010 10:59 Internal ADJ 22.6°C Diff -1ppm -----------------------29 02.Mar 2010 16:34 External ADJ USER 24.6°C Diff 4ppm -----------------------30 02.Mar 2010 18:36 Internal ADJ 22.
Information Cell type Tolerance revision number Language Display CELL TYPE MMAI4000G2 TOLERANCE NO2 ENGLISH Sample Printout: -- Balance Information 05.Mar 2009 11:34 METTLER TOLEDO Balance Type ML4002 SNR 1234567890 SW V1.00 Max 4200 g Platform Rainbow TDNR 9.6.3.411 Cell ID 1172400044 Cell Type MMAI4000G2 Tolerance Rev.no. 2 Language English ------------------------ 18.8 Service Provider Information The service provider Information function allows you to print information about your service provider.
19 Communication with Peripheral Devices 19.1 Function PC-Direct The numerical value displayed at the balance can be transferred to the cursor position in Windows Applications (e.g. Excel, Word) as by typing with the keyboard. Note: The units will not be transferred. Requirements ● PC with Microsoft Windows® operating system and serial interface RS232. ● Windows Application (e.g. Excel). ● Balance to PC connection with cabel RS232 (e.g. No. 11101051 see chapter accessories).
Complete the settings a) Click "Apply" when active (wait until active). b) Click "OK" . Note: If the "serial key" is enabled, applications that use the same port may not function correctly. Remove the check mark from the check box "Use Serial Keys" to disable serial key function. Checking Operation a) Start Excel (or another application) at the PC. b) Activate a cell in Excel. According to your selected "PC-DIR.
20 Firmware (Software) Updates METTLER TOLEDO is continuously improving its balance firmware (software) for the benefit of customers. So that the customer can benefit quickly and easily from further developments, METTLER TOLEDO makes the latest firmware versions available on the Internet. The firmware made available on the Internet has been developed and tested by Mettler-Toledo AG using processes that meet the guidelines of ISO 9001.
21 Error and Status Messages 21.1 Error Messages Error messages in the display draw your attention to incorrect operation or that the balance could not execute a procedure properly. Error Message Cause Rectification NO STABILITY No stability. WRONG ADJUSTMENT WEIGHT Wrong adjustment weight on pan or none at all. Reference for piece counting too small. EEPROM (memory) error. Ensure more stable ambient condi tions. If not possible, check settings for environment.
21.2 Status Messages Status messages are displayed by means of small icons. The status icons indicate the following: Status Icon Signification Service Reminder Your balance is due for servicing. Contact your dealer's customer service department as soon as possible to have a technician service your balance. (See menu topic "SRV.
22 Cleaning and Service Every now and then, clean the weighing pan, draft shield element, bottom plate, draft shield (depending on the model) and housing of your balance. Your balance is made from high-quality, durable materials and can therefore be cleaned using a damp cloth or with a standard, mild cleaning agent. Please observe the following notes: ● The balance must be disconnected from the power supply ● Ensure that no liquid comes into contact with the balance or the AC adapter.
23 Interface Specification 23.1 RS232C Interface Each balance is equipped with an RS232C Interface as standard for the attachment of a peripheral device (e.g. printer or computer). Schematic Item Specification Interface type Voltage interface according to EIA RS-232C/DIN66020 CCITT V24/V.
● The possible input for "text" is a sequence of characters of the 8-bit ASCII character set from 32 dec to 255 dec. ● Each command must be closed by CRLF (ASCII 13 dec., 10 dec.). The characters CRLF, which can be inputted using the Enter or Return key of most entry keypads, are not listed in this description, but it is essential they be included for communication with the balance. Example S – Send stable weight value Command S Get the current stable net weight value.
Description Description I11 I14 Query balance type Query balance information SR SRU K Keys: set configuration ST M02 Query/set environment SU M03 M08 M09 M11 M14 M15 M17 Query/set AutoZero Display brightness Display contrast Beeper: Query/set volume List available language Query/set language FACT: query/set single time criteria (no pos sibility to set "weekday" Custom unit definition Remarks: no possibility to set "name" of unit Get application list Get/set current application Adjustment histor
24 Technical Data 24.1 General Data Power Supply • AC operation: AC/DC Adapter Primary: 100V–240V, 50/60Hz, 0.3 A Secondary: 12VDC, 0.84A (with electronic overload protection) Power supply to the balance: 8–20VDC, 10W Use only with a tested AC Adapter with SELV output current. Ensure correct polarity • Battery operation: 8 standard AA (LR6) batteries (alkaline) for 8–15 hours of use.
Model ML54 ML104 ML204 Weights for routine testing Large Weight/Class OIML/ASTM Small Weight/Class OIML/ASTM Minimum weight (acc. to USP) Minimum weight (U=1%, k=2) Minimum weight (OIML) Settling time, typ. Weighing technology Usable height of draft shield [mm] Weighing pan dimensions (WxD) [mm] Balance dimensions (WxDxH) [mm] Net Weight [kg] 50 g / F2/4 2 g / E2/2 0.3 g 0.02 g 0.01 g 2s MonoBloc 235 Ø 90 193x290x331 4.1 100 g / F2/4 5 g / E2/2 0.3 g 0.02 g 0.01 g 2s MonoBloc 235 Ø 90 193x290x331 4.
Model ML303E ML503 Weights for routine testing Large Weight/Class OIML/ASTM Small Weight/Class OIML/ASTM Minimum weight (acc. to USP) Minimum weight (U=1%, k=2) Minimum weight (OIML) Settling time, typ. Weighing technology Usable height of draft shield [mm] Weighing pan dimensions (WxD) [mm] Balance dimensions (WxDxH) [mm] Net Weight [kg] 200 g / F2/4 10 g / F1/3 3g 0.2 g 0.02 g 1.5 s MonoBloc 105 Ø 120 184x290x188 2.8 500 g / F2/4 20 g / F1/3 3g 0.2 g 0.02 g 1.5 s MonoBloc 230 Ø 120 193x290x331 4.
Model ML1602 ML3002 ML3002E Minimum weight (acc. to USP) Minimum weight (U=1%, k=2) Minimum weight (OIML) Settling time, typ. Weighing technology Weighing pan dimensions (WxD) [mm] Balance dimensions (WxDxH) [mm] Net Weight [kg] 30 g 2g 0.5 g 1.5 s MonoBloc 170x190 184x290x84 3.6 30 g 2g 0.5 g 1.5 s MonoBloc 170x190 184x290x84 3.6 30 g 2g 0.5 g 1.5 s MonoBloc 170x190 184x290x84 3.
24.2.4 Balances with Readability of 0.1 g Technical Data Model ML601E* ML1501E* ML3001E* ◊ 620 g 0.1 g 0...620 g 0.1 g 0.1 g 5 ppm/°C no 100...620 g 1520 g 0.1 g 0...1520 g 0.1 g 0.1 g 5 ppm/°C no 100...1520 g 3200 g 0.1 g 0...3200 g 0.1 g 0.2 g 5 ppm/°C no 1000...3200 g 500 g / F2/4 20 g / F2/4 300 g 20 g 5g 1s Strain Gauge Ø 160 184x290x84 2.3 1000 g / F2/4 50 g / F2/4 300 g 20 g 5g 1s Strain Gauge Ø 160 184x290x84 2.3 2000 g / F2/4 100 g / F2/4 300 g 20 g 5g 1s Strain Gauge Ø 160 184x290x84 2.
Model ML6001E Readability Taring range Repeatability (sd) Linearity Sensitivity temperature drift (10...30°C) Internal adjustment Adjustment range with external weights Weights for routine testing Large Weight/Class OIML/ASTM Small Weight/Class OIML/ASTM Minimum weight (acc. to USP) Minimum weight (U=1%, k=2) Minimum weight (OIML) Settling time, typ. Weighing technology Weighing pan dimensions (WxD) [mm] Balance dimensions (WxDxH) [mm] Net Weight [kg] 0.1 g 0...6200 g 0.1 g 0.2 g 5 ppm/°C no 1000...
24.3 Dimensions 24.3.1 Balances with Readability of 0.
24.3.
24.3.
24.3.4 Balances with Readability of 0.
24.3.5 Balances with Readability of 0.01 g / 0.
70 Models: ML2001 ML4001 ML6001 84 24.3.6 Balances with Readability of 0.
25 Accessories and Spare Parts 25.1 Accessories Description Part No. Density Determination Density kit ML-DNY-43 for NewClassic ML Balances (d = 0.
RS-P26 printer with RS232C connection to balance (with date and time) 11124303 RS-P28 printer with RS232C connection to balance (with date, time and applications 11124304 Cables for RS232C Interface RS9 – RS9 (m/f): connection cable for PC, length = 1 m 11101051 RS9 – RS25 (m/f): connection cable for PC, length = 1 m 11101052 RS9 – RS9 (m/m): connection cable for devices with DB9 (f) socket, length = 1 m 21250066 RS232 - USB converter – intelligent expansion module for con nection to PC 11103691
PowerPac-M-12V, for mains independent operation of bal ances, 12 VDC/1 A 12122363 Protective cover for models with draft shield "165/235 mm" 12122030 Protective cover for models with round weighing pan 12122032 Protective cover for models with square weighing pan 12122031 Steel cable 11600361 LabX direct balance (simple data transfer) 11120340 Protective Covers Anti-theft Devices Software Adjustment Weights OIML / ASTM Weights (with calibration certificate) see www.mt.
25.2 Spare Parts Balances with readability of 0.1 mg, with draft shield (235 mm) Drawing Pos Description 1 2 3 4 6 5 1 2 3 4 5 6 7 8 9 10 Part No.
Balances with readability of 1 mg, with flex draft shield (105 mm) Drawing Pos Description 4 5 6 1 2 1 2 3 4 5 6 7 8 9 Weighing pan Ø 120 mm Pan support Bottom plate Draft shield top cover Draft shield frame Draft shield glass panels Leveling foot Battery-chamber cover Weighing below balance cap Part No.
Balances with readability of 0.1 g with square weighing pan Drawing Pos Description 1 2 3 C 4 5 1 2 3 4 5 6 Part No.
26 Appendix 26.1 Conversion Table for Weight Units Kilogram Milligram Microgram Carat Pound Ounce (avdp) Ounce (troy) Grain Pennyweight Momme Mesghal Tael Hong Kong Tael Singapore (Malaysia) Tael Taiwan Tola Baht 100 Appendix 1 kg 1 mg 1 µg 1 ct 1 lb 1 oz 1 ozt 1 GN 1 dwt 1 mom 1 msg 1 tlh 1 tls = = = = = = = = = = 1 tlt 1 tola 1 baht = = = = 1000.0 0.001 0.000001 0.2 453.59237 28.349523125 31.1034768 0.06479891 1.55517384 3.75 4.6083 37.429 37.
27 Index A AC operation Accessories Adjustment Advanced menu Advanced Menu Ambient conditions Appendix Application “Check Weighing” Application “Density” Application “Diagnostics” Application “Division Factor Weighing” Application “Dynamic Weighing” Application “Formulation” Application “Multiplication Factor Weighing” Application “Percent Weighing” Application “Piece Counting” Application “Routine Test” Application “Statistics” Application “Totaling” Application “Weighing” Application icons Assign Applicat
Conventions and symbols Conversion table for weight units 7 100 D Data communication format Date Date format Delivery inspection Density Density kit Density table for distilled water Density table for ethanol Diagnose Diagnostics Diagnostics application Dimensions Display panel Display test Disposal Distilled Water Division Factor Weighing Draft Shield Dynamic Weighing 34 27 29 13 57 57 61 62 31 66 31 88 11 67 8 61 55 14, 78 51 E End of Line Environment Error messages ethanol External weight 36 29 76 6
Interface RS232C Internal weight Interval Introduction 32, 79 19 36 7 K Key assign Key beep Key functions Key test 31 28 10 68 Leveling the balance Line feed Liquid Liquids Location 16 34 57 59 16 L M Main Menu Manual adjustment with external weight Manual adjustment with internal weight Menu Menu Advanced Menu Basic Menu Interface Menu operation Menu protection Menu topic Motor test MT-SICS interface commands and functions Multiplication Factor Weighing 27 20 19 25, 27 25, 29 25, 27 25, 32 26 27 26
Q Quickstart 22, 30 Recall Repeatability test Reset Routine Test RS232C interface 24, 30 66 29 63 32, 79 R S Safety precautions Saving settings Select menu Select menu topic Selecting the location Service Service date reset Service icon Service provider information Service reminder Setting up the balance Shutoff Signature line Single Sinker Software update Solids SOP Spare parts Stability beep Startup Statistics Status icons Status messages Stop bit Submenu Switching the balance on and off Switching we
Transporting the balance 18 U Unit Unpacking 28, 28 13 W Warning Limit Weighing below the balance Weighing made simple Weighing-in aid Weight unit 64 19 22 24 23, 28, 28, 100 Z Zero print Zero range Zero setting Zeroing 34 31 23 31 Index 105
www.mt.com/newclassic For more information Mettler-Toledo AG, Laboratory & Weighing Technologies CH-8606 Greifensee, Switzerland Tel. +41 (0)44 944 22 11 Fax +41 (0)44 944 30 60 www.mt.com Subject to technical changes. © Mettler-Toledo AG 11/2010 11781287D 2.