
Installation & Assembly

Page 2/2
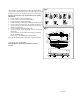
Replacing LED module (Fig. 3)
The LED module can be replaced by a qualified electrician without
cutting of wire and without damage to any decorative element to which
the fixture is attached. See installation steps for more details (Fig.3)
Warning: Turn off power at the circuit breaker before replacing
LED module.
a. Loosen part (B,C,U), and remove glass (V).
b. Loosen screws (S) and remove fabric shade (T).
c. Loosen part (P,Q,O) and remove part (R).
d. Loosen screws (01), housing (02), and disconnect wire connector.
e. Loosen screws (11), remove case (15), and slide out diffuser (14).
f. Loose screws (13), remove rubber washers (12) and carefully
remove LED module (16).
g. Loosen screws (04) and remove bracket (W).
h. Loosen hex nut (03), remove nipple (09), stud (10), and slide out
diffuser (08).
i. Loose screws (07), remove rubber washers (06) and carefully
remove LED module (05).
j. Reverse steps a-j for installing the new LED module.
Note: The LED module should be provided by a specified supplier.
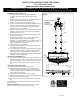
IMPORTANT: Fixture should be installed by a qualified electrician to
ensure proper wiring and installation.
Dimmable with ELV and/or LED compatible wall dimmer
switches.
Fig.3
T
V
U
R
S
P
Q
15
08
07
06
05
03
02
01
04
W
O
12
13
14
09
10
11
16
C
B
Fig.2