
Instruction Manual


8.1 Installation and program start
797 VA Computrace – Software
205
8 How to ...?
8.1 Installation and program start
Install Dosing Devices for automatic addition
1. Connect Dosing Devices (possible: 700/800 Dosino , 685/805
Dosimat) to the 797 VA Computrace stand or the 846 Dosing
Interface (see Installation of Dosing Devices, section 1.3).
2. Make hardware settings for Dosing Devices.
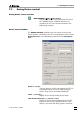
3. Select Automatic for Addition in the WORKING METHOD SPECI-
FICATIONS
window.
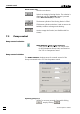
4. Define the addition or predose solution in the
DOSINOS win-
dow (see
Dosing Devices, section 5.2).
5. The number defined in the No. field of the Substances tab of
the EDIT WORKING METHOD PARAMETERS window should
correspond with the number of the Dosing Device used for the
addition of this substance.
Switch on the instruments and start program
1. Switch on PC.
2. Connect Dosing Devices ( see Installation of Dosing Devices,
section 1.3), Sample Changer (see Installation of 863 Compact
VA Autosampler section 1.3, or
Installation of 838 Advanced
Sample Processor section 1.3) and the 843 Pump Station to the
797 VA Computrace stand.
3. Connect the 797 VA Computrace stand to the PC (via USB).
4. Switch on 797 VA Computrace stand, Sample Changer and 731
Relay Box.
5. Start 797 VA Computrace Software 1.3.x (see
Starting the VA
Computrace program, section 2.2).
6. Enter Name and Password in the VA COMPUTRACE LOGIN win-
dow (see Login, section 2.6).
7. Select exploratory or determination mode (see Mode menu,
section 2.4).
8. Open the desired Exploratory mode windows (Exploratory
specifications, Exploratory curves) or Determination mode win-
dows (Working method specifications, Monitor, Determination
curves, Results, Sample table).