
Manual


5.1 Setting up the Oven
768 KF-Ofen
44
5. Preparations
Ensure that the set operating voltage matches the mains voltage before you switch the ap-
paratus on.
If this is not the case, the operating voltage must be changed over:
1. Disconnect mains plug. Detach all tubing and cable connections to the oven. Take out
drying flasks.
2. Unscrew the 3 screws at the bottom of the oven at the front.
3. Unscrew the 3 screws at the green edge at the rear of the oven.
4. Carefully lift off top part of oven and lower to the front.
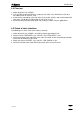
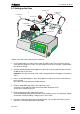
5. The connectors on the board in the vicinity of the power supply unit must be plugged in
as follows:
View of the board from above
220...240 V
230 V
115 V
230 V
115 V
100...120 V
230 V
115 V
230 V
115 V
Jumper
Jumper
The white connector on the left is plugged into the appropriate socket.
The jumpers are changed over using tweezers.
6. Close apparatus again and reconnect tubing and cables.
7. Note the new setting of the voltage on the model plate at the rear of the oven.
When the apparatus is opened or if parts are removed from it, certain components may be
live if the apparatus is connected to the power supply. The mains cable must therefore al-
ways be disconnected when certain adjustments are made or parts replaced.
The mains cables supplied with the instrument are three-core and fitted with a plug with an
earthing pin. Each break in the earthing inside or outside the apparatus can make it a source
of danger.
Plug in or unplug connecting cables only when the apparatus is switched off.
C9
P8
P7
C9
P8
P7