
Owner's manual
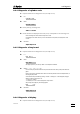
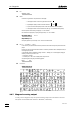
Table Of Contents
- Content
- Overview
- Operation with the keyboard
- Error messages, troubleshooting
- Diagnosis
- General
- Summary
- Prepare instruments for diagnostic tests
- Diagnosis of cylinder code
- Diagnosis of key board
- Diagnosis of display
- Diagnosis analog output
- Diagnosis of digital timer
- Diagnosis of analog timer
- Diagnosis of external inputs, outputs
- RAM-test
- Diagnosis of spindle zero and cock changeover
- Diagnosis of spindle drive
- RAM-initialisation
- Releasing a locked spindle
- Operation via RS232 Interface
- Appendix
- Index
3.2 Diagnosis
765 Dosimat
23
3.2.4 Diagnosis of cylinder code
1.
Prepare instrument for diagnostic test (see chap. 3.2.3).
2.
<0>
cylinder code
3.
<GO>
no exch. unit!
4.
Insert (dummy) exchange unit.
code: xx ml
5.
Check whether the displayed ml-Code (xx ml) corresponds to the exchange unit.
Various exchange units can be inserted to verify their ml-code.
If an exchange unit is coded incorrectly or if the code switches are inoperative, the display shows: E 90: ..
no code!
6.
<CLEAR>
diagn. Key 0...9
3.2.5 Diagnosis of key board
1.
Prepare instrument for diagnostic test (see chap. 3.2.3).
2.
<1>
keys test }
3.
<GO>
key: rate
The display requests to press the key <RATE> on the keyboard 6.2149.000.
4.
<RATE>, <7>, <4>, <1> etc.
If the correct key was pressed and the test was positive the name of the next key to be pressed will be dis-
played.
Display E 10: and on the right-hand side the name of an other key indicates a fault in the keyboard matrix, or
the wrong key was pressed.
A fault indication may be cancelled by pressing <CLEAR>. “breaking off ?“ is then displayed, asking you
whether you want to stop the test or not.
- To stop press <CLEAR>.
- To continue press <GO> until the display shows “keys test end“
After pressing the last key (GO), the following appears:
keys o.k.
5.
<CLEAR>
diagn. key 0...9
3.2.6 Diagnosis of display
1.
Prepare instrument for diagnostic test (see chap. 3.2.3).