
Owner's manual
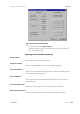
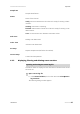
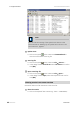

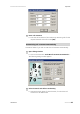


Table Of Contents
- Table of contents
- Table of figures
- 1 Introduction
- 2 Overview of the instrument
- 3 Installation
- 4 Operation
- 4.1 Fundamentals of operation
- 4.2 Instrument and Program Settings
- 4.3 Program information
- 4.4 Calibration functions
- 4.5 Methods
- 4.6 Determinations
- 4.6.1 Preparing samples
- 4.6.2 Preparing the instrument and the accessories
- 4.6.3 Preparing the determination
- 4.6.4 Starting the determination
- 4.6.5 Cleaning the instrument and accessories
- 4.6.6 Adjusting the method parameters during the determination
- 4.6.7 Stopping the determination manually
- 4.6.8 Status of the live curve
- 4.7 Results
- 4.8 GLP functions
- 5 Handling and maintenance
- 6 Troubleshooting
- 7 Technical specifications
- 8 Conformity and warranty
- 9 Accessories
- Index

4.4 Calibration functions
■■■■■■■■■■■■■■■■■■■■■■
48
■■■■■■■■
743 Rancimat
Time
Time of the event. The format depends on the settings defined in Win-
dows in Control Panel ▶ Country settings ▶ Time.
User
Name of the user logged in at the time of the event.
Unit
Instrument number (1…4).
Event
Description of the event.
4.4 Calibration functions
4.4.1 Determining cell constants
Only the change in conductivity is measured an evaluated during the
Rancimat measurement. As a result, the cell constants of the conductivity
measuring cells used in the Rancimat, which are normally in the range
from 1.00...1.20, only have to be entered exactly if the absolute con-
ductivity measured value is to be displayed correctly.
The value also has to be entered before carrying out the GLP test "Con-
ductivity". The cell constants can thereby be entered manually or deter-
mined automatically using a defined standard solution (see Optional
accessories, page 185).
Entering cell constants manually
Proceed as follows if you wish to enter the cell constants manually:
1
Open dialog window
■ Click on the menu item Tools ▶ Cell constants ▶ Manual....
The following dialog window appears: