
Owner's manual
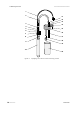
Table Of Contents
- Table of contents
- Table of figures
- 1 Introduction
- 2 Overview of the instrument
- 3 Installation
- 4 Operation
- 4.1 Fundamentals of operation
- 4.2 Instrument and Program Settings
- 4.3 Program information
- 4.4 Calibration functions
- 4.5 Methods
- 4.6 Determinations
- 4.6.1 Preparing samples
- 4.6.2 Preparing the instrument and the accessories
- 4.6.3 Preparing the determination
- 4.6.4 Starting the determination
- 4.6.5 Cleaning the instrument and accessories
- 4.6.6 Adjusting the method parameters during the determination
- 4.6.7 Stopping the determination manually
- 4.6.8 Status of the live curve
- 4.7 Results
- 4.8 GLP functions
- 5 Handling and maintenance
- 6 Troubleshooting
- 7 Technical specifications
- 8 Conformity and warranty
- 9 Accessories
- Index
■■■■■■■■■■■■■■■■■■■■■■
3 Installation
743 Rancimat
■■■■■■■■
19
4
Insert the fuse holder
■ Push the fuse holder back into the instrument until it latches into
place.
3.3.3 Mains cable and mains connection
Mains cable
The mains cable optionally supplied for the instrument
■ 6.2122.020 with plug SEV 12 (Switzerland)
■ 6.2122.040 with plug CEE(7), VII (Germany, …)
■ 6.2122.070 with plug NEMA 5-15 (USA, …)
is three-core and provided with a plug with grounding pin. If another plug
has to be mounted, the yellow/green conductor (IEC standard) must be
connected to the protective ground (protection class I).
Warning
Any interruption to the grounding within or outside the instrument can
make it dangerous!
Mains connection
Plug the mains cable into the mains connection socket of the Rancimat.
3.3.4 Switching the instrument on/off
The Rancimat is switched on and off using the mains switch. When
switching the instrument on, the pilot lamp ON lights up on the front of
the instrument auf.
3.4 Connecting a PC
3.4.1 Connecting the 743 Rancimat and the PC
Caution
Always switch the Rancimat and PC off before you connect the two
devices with the RS-232 cable 6.2134.100.
The PC program 743 Rancimat allows control of max. 4 instruments.
The following options are available for connecting the instruments to
serial PC interfaces:
■ Connection to integrated COM interfaces of the PC
■ Connection to an additional integrated interface expansion card