
User guide


3.3 Putting into operation
732 IC Detector / 733 IC Separation Center
51
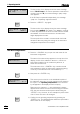
>CONFIG/detector
'zero' unit: µµS/cm
The next inquiry of the submenu "detector" appears,
namely the unit for display of the auto-zero value.
This parameter also contains the character ":". The
<SELECT> key can be used to select the other values
"%fs" (% full scale) or "mV". For our example, however, the
preset value "µS/cm" need not be changed.
ENTER
⇒ Confirm the set unit by pressing the <ENTER> key.
>CONFIG/detector
cell constant 16.7 /cm
The cell constant of the conductivity cell in the detector
block appears as the next inquiry of the submenu
"detector". Each detector block has a characteristic cell
constant which is determined in the factory and printed on
the block. To ensure that the absolute conductivity is cor-
rectly displayed, this value must be entered on first time
startup.
Please note that this parameter does not contain the
character ":". This means that here values must be en-
tered using the numeric keys. Hence press the corre-
sponding numeric keys in the correct sequence to enter the
value printed on the detector block. During the entry you
can always return to the default value by pressing the
<CLEAR> key and restart the entry.
>CONFIG/detector
cell constant 17.1 /cm
A cell constant of 17.1 /cm is entered here as an example.
ENTER
⇒ Confirm the cell constant just entered by pressing the
<ENTER> key.
CONFIG
>CONFIG/printer
As the previous inquiry was the last of the submenu
"detector", a switch is now made automatically to the title
of the next submenu "printer", which contains various in-
quiries concerning the printout on an external printer. As no
printer is attached in our example, the next submenu can
be selected directly.
7
CONFIG
⇒ To do this, press the <CONFIG> key.
CONFIG
>CONFIG/print meas.value
The title of the submenu "print meas.value" appears in
the bottom display line. The submenu contains various in-
quiries for the measured value printout on an external
printer, but again we are not interested in this at the present
time.
7
CONFIG
⇒ Press the <CONFIG> key again.