
Manual

6. Appendix
711 Liquino, Instructions for use
151
6.5.2 Overview
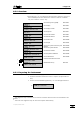
Access to the diagnosis main menu is described in section 6.5.3.
By pressing key <9> the submenus are selected in sequence. Access to
the individual queries in a submenu is carried out with the <ENTER>
key, exit is with the <QUIT> key.
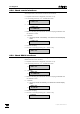
di agnosi s
> RAM t est
check working memory (RAM)
Sect. 6.5.4
di agnosi s
>di spl ay t est
check display
Sect. 6.5.5
di agnosi s
>di spl ay cont r ast t est
check display contrast
Sect. 6.5.6
di agnosi s
>key t est
check keyboard
Sect. 6.5.7
di agnosi s
>r emot e t est
check remote interface
Sect. 6.5.8
di agnosi s
>RS232 t est
check RS232 interface
Sect. 6.5.9
di agnosi s
>ext er nal bus t est
check external bus
Sect. 6.5.10
di agnosi s
>beeper t est
check beeper
Sect. 6.5.11
di agnosi s
>memor y car d t est
check memory card and memory card
interface
Sect. 6.5.12
di agnosi s
>m. car d i nt er f ace t est
check memory card interface
Sect. 6.5.13
di agnosi s
>dosi no t est
check Dosino interface
Sect. 6.5.14
di agnosi s
>t emper at ur e cal i br at i on
check temperature calibration
Sect. 6.5.15
di agnosi s
>power on r eset
check software reset
Sect. 6.5.16
1)
di agnosi s
>i nst r ument number
read and write instrument number
2)
di agnosi s
>RAM initialization
initialize data memory
Sect. 6.6
6.5.3 Preparing the instrument
• Switch off mains supply.
• Remove all external connection from 711 Liquino (except mains ca-
ble).
• Switch on and immediately press key <9> and keep pressed until
di agnosi s
>RAM initialization
1)
This diagnosis step is reserved for the service technician and is therefore not described in this
booklet.
2)
Take care: this diagnosis step can clear the complete data memory.