
Installation Instructions


Thin Brick Installation and Maintenance
P.O. Box 9240 Canton, Ohio 44711 1-800-325-3945 e-mail: info@ironrock.com www.metroceramics.com
Initial Cleaning and Seasoning
1. It is the installer’s responsibility to thoroughly clean and remove all grout or mortar residue from the new tile surface.
2. Because grout joints are porous and highly susceptible to staining, you may wish to protect them with an application of
a water - based penetrating sealer, such as Aqua Mix Penetrating Sealer.*
3. Season the floor by mopping thoroughly with a double strength application of Hillyard’s Super Shine-All®, Murphy’s Oil
Soap®, or other neutral liquid cleaner. *If the floor will be subject to frequent staining by fat, oil or grease spills, you may
wish to apply the penetrating sealer to the tile as well as the grout joints to enhance the tile’s soil resisting characteristics.
Make sure to apply the penetrating sealer before seasoning the floor. Follow the manufacturer’s directions carefully.
Wipe up all excess sealer immediately to prevent surface discoloration. NEVER USE A COATING (SURFACE TYPE)
SEALER because they do not adhere well to the tight dieskin surface.
Recommended Maintenance
1. Sweep, vacuum, or damp mop as necessary to remove dust, dirt and grit.
2. Remove heavy spills or spots immediately with a heavy detergent and stiff brush or a non-metallic scouring pad. Do
not use any cleaner containing Hydrofluoric acid which will attack both grout and tile.
3. Routinely mop the surface with a neutral liquid cleaner, such as Hillyard’s Super Shine-All®. Use a simple two-bucket
method. The first bucket should contain the neutral cleaner diluted per the manufacturer’s recommendations in hot water.
After mopping or scrubbing a small area of floor not to exceed 2-3 square feet, the mop should be rinsed in the second
bucket containing clean water. The rinse water in the second bucket should be changed regularly.
4. Mop up any dirty cleaning solution and allow floor to dry thoroughly. Under normal conditions, rinsing is not necessary.
However, if the surface is extremely dirty, it should be allowed to dry and mopped again. Over time a natural patina will
develop. It can be enhanced with a soft buffing.
5. For applications in restaurants/cafeteria service and dining areas, at least once per week – and more often if necessary
– the floor should be scrubbed with a solution of Hillyard’s Assurance® all-purpose cleaner or a comparable product and
a scrub brush. Contact us for complete instructions on maintaining a Metropolitan floor in food service areas.
See our web site for complete downloadable cleaning and maintenance information.
If you have any questions about maintaining your Metropolitan Ceramics® floor, call us at 1-800-325-3945.
Metropolitan Ceramics – PO Box 9240 – Canton, OH 44711
Fax: 330-484-3584 - E-mail: info@ironrock.com - www.metroceramics.com
Hillyard, Inc. Aqua Mix, Inc.
Phone: 800-365-1555 Phone: 562-946-6877
http://www.hillyard.com Technical Assistance: 800-366-6877
www.custombuildingproducts.com
CANTON, OHIO
®
®
INDOOR / OUTDOOR
A product of Metropolitan Ceramics
UNGLAZED CERAMIC QUARRY TILE
QUARRY TILE AND THIN BRICK
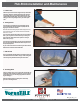
5 - Chalk Lines
Measure up one foot from the ledge and snap a horizontal
line with a chalk line. Continue working up the wall every
foot marking lines as you go. Make sure these lines are
parallel with the bottom ledge. These lines will be a guide
letting you know everything is level as you brick up the
wall.
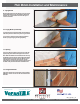
6 - Cutting Bricks
You will need to cut bricks for the left and right ends of
your wall beginning with the half pieces (kerfs) that will
begin your second row of bricks.
Note: take into account the grout joint when cutting kerfs. They
are not just bricks cut in half. The kerf size for Versa Tile thin
brick is 2 ¾” x 3 5/8”.
You can either calculate and make all of your cuts ahead of
time or you may want to cut the bricks as you work your
way up the wall. Often, walls aren’t square so it may be
best to cut as you go.
You will want to start bricking your wall on the end that will
be a focal point because that end will have full pieces and
true (kerfs) half pieces.
As you come to the other end of the wall you will be able to
determine the cuts that needs made there.
7 - Mix Thinset
If you are installing with bag thinset, mix thinset mortar per
the manufacturers instructions. Using a mortar mixing tool
and a heavy duty drill will make this job much easier.
MET_TB_CM_11_15
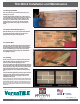
8 - Installing Brick
Choose a bottom corner of your wall at the wood ledge you
installed to begin troweling on adhesive. Trowel on only as
much adhesive as you can easily apply bricks to before it
begins setting up.
Hold the notched trowel at a 45°angle to create deep
grooves for holding the brick.