
User's Guide
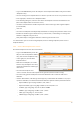
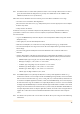
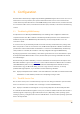
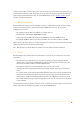
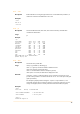
Table Of Contents
- Remote Terminal Unit M717
- Table Of Contents
- Introduction
- Installation
- Register the RTU to the M2M Gateway
- The SDI Connector
- The MPI Connector
- The Micro USB Service Connector
- About the Data Acquisition Subsystem
- SDI-12 Sensors
- Create a New Template From an Existing One
- Create a New Template From Scratch
- Interface to a Davis Vantage Pro Console
- Interface to a Thies TDL14 or DL16 Data Logger
- Mechanical Installation
- Operation
- Configuration
- Commands
- General Commands
- help
- ver
- echo
- ps
- date
- log
- attr
- pin
- hwid
- connect
- xfer
- fwupdate
- reboot
- exit
- Data Acquisition Commands
- dacq
- dacq info
- dacq sample
- dacq retrieve
- dacq abort
- dacq date
- dacq interval
- dacq direct
- dacq t
- hist
- hist info
- hist stat
- hist map
- hist purge
- Data Acquisition Legacy Commands
- sdi t
- thi t
- thi direct
- Communication Commands
- net
- net get
- net up
- net down
- net session
- modem
- modem direct
- modem pwrdown
- modem pwrup
- modem reset
- modem mode
- File System Commands
- ls
- mkdir
- cd
- cp
- pwd
- rm
- cat
- Command Line Interface Error Messages
- Attributes
- Technical Specifications

•
Log in to the M2M Gateway and in the left pane click and expand the “Admin” entry, then click the
“Templates” entry.
•
Select an existing sensor template which is as much as possible close to the one you want to create.
•
In the right pane, click the “Save as Template” button.
•
In the following dialog box, enter the name of the new template and select the destination area
(where the template will be saved on the server).
•
Check the “Include children” checkbox if you want to take over the tags of the original template
(recommended).
•
Click "OK".
•
Select the new template and verify/modify its attributes according to the parameters of the sensor.
•
Examine the children tags and delete the ones you don’t need, or add new tags according to the
hardware configuration of your sensor.
•
Verify and modify accordingly the attributes of all the tags of the new sensor.
In a similar fashion you can create new tag templates, based on existing templates (use the “Save as
Template” button).
2.6.2. Create a New Template From Scratch
This method requires more work. Proceed as follows:
•
Log in to the M2M Gateway and in the
left pane click and expand the “Admin”
entry, then click the “Templates” entry.
•
On the right pane, click the “New
Template” button.
•
Name the new template; use a name
that can easily identify the new sensor,
usually the manufacturer and the type
of the sensor.
•
Select from the Template Class
“sensor” and click "OK". The new template will be generated, however it will be empty.
•
Select the newly generated template and click the “Attributes” tab. You will now add several
attributes.
•
Click the “New” button; in the dialog box that appears you must define the attribute. For a proper
operation of the RTU, a list with the minimum of attributes required and their parameters follows:
•
acquisitionMode, type: int, flags: r/w,RTU=x, Size: , Value: 2
•
acquisitionSchedule, type: string, flags: r/w,RTU=x, Size: 100, Value: */10
•
iconName, type: string, flags: a/a, Size: 20, Value: COMBO
•
sdiAddress, type string, flags: a/a,RTU=x, Size: 1, Value:
•
sdiInfo, type: string, flags: r/-, Size: 40, Value:
•
sdiMethod, type:string, flags: a/a,RTU=x, Size: 3, Value:
9