
Specifications

32
01/2009 Rev. 2.0
3. INSTALLATION
3.1 Unpacking
The machine has been carefully packed to prevent damage being caused to your new
coffee maker. Remove the packing carefully without using sharp objects. Check if the
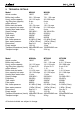
appliance is complete. The appliance is delivered with the following accessories:
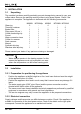
M200W MT200Wp M202W MT200W MT202W
Glass jug 2 - 4 - -
Thermos container - - - 1 2
Basket filter 1 1 2 1 1
Filter paper (25 pcs.) 1 1 1 1 1
Coffee measuring cup 1 1 1 1 1
Funnel 1 1 1 1 1
Water connection hose 1 1 1 1 1
Coffee fur remover 1 1 1 1 1
Scale remover 1 1 1 1 1
Manual 1 1 1 1 1
Synthetic drip tray - - - 1 2
Stainless steel drip tray 1 1 1 1 1
Please contact your dealer if any parts are missing or damaged.
3.2 Installation
3.2.1 Preparation for positioning the appliance
- Position the appliance at buffet height on a firm, level base that can bear the weight
of the appliance when it is filled.
- Position the appliance level and in such a way that it cannot cause any damage if it
leaks.
- Thewatersupplypipe(G3/4”pipe15mm)andthepowerconnectionmustbe
situated within half a metre of the appliance.
- The owner must have these installation-technical preparations performed by qualified
engineers in accordance with general and local regulations.
- The service engineer may only connect the appliance to the prepared connections.
3.2.2 Electrical connection
Supply voltages and frequencies can differ between countries. Check if the appliance is
suitable for connection to the local power mains. Check if the details on the type plate
correspond. Connect the appliance to an earthed wall socket.
CAUTION
• Wateralwaysremainsintheheatingsystem:forthis
reason the appliance must not be placed in an area
where the temperature can fall below freezing point.