M200W, M202W, MT200W, MT200Wp MT202W 2.5 2.4 2.
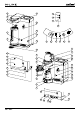
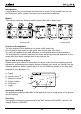
9 8 BOILER 12.1 5 12.2 10 12.3 11 12 12 2.5 S 1 2.4 2.4 2 13 1,2 1 7 RT TA P S TO BOILER 15 5 5.1 5.2 5.3 5.4 5.5 7 16 8 23 6 22 9 5 21 10 4 20 11 s tem gsys akin 19 team .. W and ..... ..... ee..... ..... Coff ..... ..... ..... z o im ......... / ..... 60H D An .............. V 50N A ..... .... LL .................... O H ............... IN ..... E D A M 12 13 18 17 14 BOILER 15 3 2 1 23 17 Anim o Coffee- ............. teamakings ........... ystems ......
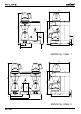
W E 100 380 E W 38 140 220 Hot water boiler 160 460 620 420 225 420 M200W fig. 1/Abb. 1 E W 225 380 365 E&W 38 220 Hot water boiler 160 460 620 420 620 M202W fig. 2/Abb. 2 01/2009 Rev. 2.
180 360 320 585 420 E W 50 100 380 E W 55 Hot water boiler 420 MT200Wp fig. 3/Abb. 3 420 2,5 650 2,4 2,2 2 1,2 410 370 1 10 E 50 W 100 380 460 E W 125 55 180 Hot water boiler 420 MT200W fig. 4/Abb. 4 01/2009 Rev. 2.
Nederlands . .................................... 1 English ............................................ 23 Deutsch . ......................................... 45 Français .......................................... 68 420 2,5 1,2 1 1 410 2 1,2 370 2,4 2,2 2 650 2,5 2,4 2,2 310 10 W E 365 380 460 E W 125 55 180 Hot water boiler 620 MT202W fig. 5/Abb. 5 01/2009 Rev. 2.
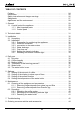
Table of Contents Preface . . . . . . . . . . . . . . . . . . . . . . . . . . . . . . . . . . . . . . . . . . . . . . . . . . . . . . Introduction . . . . . . . . . . . . . . . . . . . . . . . . . . . . . . . . . . . . . . . . . . . . . . . . . . . . . Safety instructions and danger warnings . . . . . . . . . . . . . . . . . . . . . . . . . . . . . . Safeguards . . . . . . . . . . . . . . . . . . . . . . . . . . . . . . . . . . . . . . . . . . . . . . . . . . . . . Appliances and the environment . . . . . .
© 2009 Animo ® All rights reserved. No part of this document may be reproduced and/or publicized by means of printing, microfilm, electronic or any other means whatsoever without the prior written permission of the manufacturer. This also applies to the accompanying drawings and/or diagrams. Animo reserves the right to change parts at any time without giving prior or direct notification to the customer. The contents of this manual can also be changed without prior notification.
Introduction Congratulations on your purchase and welcome to Animo! To fully benefit from the support that Animo offers, register your product at www.animo.eu/warranty Models This manual covers the following coffee makers fitted with a water boiler: 2,5 2,5 2,5 2,4 2,4 2,4 2,2 2,2 2,2 2 2 2 1,2 1,2 1,2 1 1 1 Hot water boiler M200W M202W MT200Wp MT200W MT202W double model double model Purpose of the appliance The sole purpose of this appliance is to make coffee and/or tea.
Safety instructions and danger warnings This appliance meets the mandatory safety regulations. Inexpert use can result in personal injury and material damage. The following warnings and safety instructions must be observed before using the coffee maker. Instructions for use Read these instructions for use carefully, before using this appliance. This will protect your safety and prevent damage being caused to the appliance. Perform the various actions in the order given.
Safeguards The appliance is fitted with the following safeguards: Dry-boil protection (20+21) This appliance is equipped with two dry-boil protectors on the back. The protector on the left (21) is that of the water boiler. On the right (20) is the one for the coffeemaker. These protectors are switched off if the heating elements get overheated as a result of a fault. This appliance is equiped with a dry-boil protection. This protection triggers if the heating element overheats owing to a fault.
Appliances and the environment The packing material Your new coffee maker has been carefully packaged to protect it against damage. The packing is not harmful to the environment and consists of the following materials: • Corrugated cardboard • Filler elements made of polyurethane foam covered with a polythene film (>PE-HD<). The waste processing plant in your municipality will be pleased to inform you about where you can dispose of the materials. Discarding the appliance No appliance lasts forever.
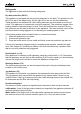
1. General 1.1 A quick look at the appliance The most important parts of the appliance are shown in the fold-out sheet in this manual. Keep the fold-out sheet open when reading the instructions. 1.1.1 Most important parts 1. Appliance on/off switch coffee making 11. section and bottom hot plate 12. 2. On/off switch for top hot plate 3. Basket filter with leak stop device 4. Basket filter paper 5. Control panel coffee maker 13. 5.1 Display 14. 5.2 Descale indicator light 15. 5.
Sound signals; Sounds three times at the end of the coffee making process. Sounds once if the jug is removed during the coffee making process. BOILER A long signal sounds when the appliance is switched on. Selection button (5.4); The selection button is used to reduce the amount of S TA RT coffee set in the display. When the lowest value is reached the display returns STOP BOILER amount. to the maximum S TA RT STOP BOILER Start/stop button (5.
2. Technical details Model Article number Buffer stock coffee Hourly coffee capacity Jug filling time (approx) coffee amount Buffer stock hot water Hour capacity hot water Heating time water boiler Supply voltage Frequency Total output Filter paper Min. water pressure Max. water pressure Dimensions Empty weight Transport dimensions (lxwxh) Transport weight M200W 10557 3.6 l./ 28 cups 14 l./112 cups 8 min. 1 -3 l. 1.8 l./14 cups 16 l./128 cups 11 min. 220-240V~ 50-60Cy 3350W 90/250 0.
3. Installation 3.1 Unpacking The machine has been carefully packed to prevent damage being caused to your new coffee maker. Remove the packing carefully without using sharp objects. Check if the appliance is complete. The appliance is delivered with the following accessories: Glass jug Thermos container Basket filter Filter paper (25 pcs.
3.2.3 Connection to the water mains Connect the appliance using the water hose to an easily accessible aeration tap that can be quickly closed if problems arise. 3.2.4 Water drainage (18) If the reservoir of the coffee maker is overfilled owing to a defect, the excessive water will be discharged via the water drain (18) at the bottom of the appliance. Make allowance for this when positioning the appliance! WARNING • Ensure that the mains lead does not come into contact with the hot plates (if present). 3.
3.2.6 Setting the descale indicator Scale deposits are left in the heating system when the appliance is used. The amount of scaling depends on the hardness of the water being used. The coffee maker is fitted with a descale indicator light (5.2), which lights up when the heating system has processed a certain quantity of water and has to be descaled. The appliance continues to work so that it can be descaled when it is not being used.
4. Daily use When using the appliance you may find that certain settings do not entirely match your requirements. • Chapter 5 explains how all settings can be adjusted by qualified personnel. • Chapter 6 explains how the appliance must be maintained by qualified personnel. 4.1 • Drip stop NOTICE The drip stop can only work if the jug detector is pressed in sufficiently by the jug.
4.3 1. 2. 3. 4. 5. 6. 7. 8. 9. 4.4 Making coffee Place a sheet of basket filter paper containing the desired amount of coffee (fast filter type) in the basket filter. See the table above for the amount of coffee required. A level coffee measure is approximately 80 grams. Slide the basket filter (3) into the appliance. Place the jug, with the lid on it, under the filter. NB! For the MT200 model, leave the lid of the thermos jug with pump open, and leave the riser tube in the jug.
4.5 Water boiler The appliance is fitted with a water boiler (9) suitable for drawing off small amounts of hot water. The water boiler is refilled automatically and kept at the right temperature. 1. 2. 3. 4.6 • • Switch the water boiler on using the on/off switch (13). The light in the switch will light up. After approx. 11 minutes the water is heated up and the green temperature ok indicator light (12.2) will light up. Hot water can now be drawn off using the no-drip (11) tap.
5.2 Setting of the display to show cups or litres The appliance is factory set to display the number of cups. If you want the display to show litres, you can adjust it as follows: 1. Press the selection button (5.4) and hold it in, then press the start/stop button (5.5) once. A number will appear in the display. 2. Release both the buttons and then press the start/stop button once again. 3. A “C” (Cups) will appear in the display. Change the “C” to an “L” with the selection button. 4.
6. Maintenance WARNING • The appliance must not be submerged or sprayed. 6.1 - Cleaning of the appliance and accessories Clean the outside of the appliance with a clean, damp cloth, if necessary using a mild (non-abrasive) cleaning agent. Do not use an abrasive, as this will leave scratches and dull patches. The glass jugs and the basket filter can be washed normally and rinsed clean.
CAUTION • Stay close to the appliance when performing maintenance. • It is advisable to wear safety glasses and protective gloves when descaling the appliance. • Flush the appliance at least two times after descaling it. • Wash your hands thoroughly after descaling the appliance. 6.2 Descaling 6.2.1 Descaling of the coffee maker Scale deposits are left in the heating system when the appliance is used. The amount of scaling depends on the hardness of the water being used.
6.2.2 Switching-off the descale indicator light 1. 2. Press the selection button (5.4) for 6 seconds; the descale indicator light (5.2) will go out. The control system resumes registering the number of brewing processes. ATTENTION Leave the lid of the water boiler open during the descaling process. 6.2.3 Descaling the water boiler 1. 2. 3. 4. 5. 6. 7. 8. 9. 10. 11. 12. 13. 14. Before descaling the water boiler, carefully read the instructions for using the descaling agent.
7. Troubleshooting WARNING • Have all repairs to the electrical system performed by a qualified service technician. If your appliance is not functioning correctly, use the troubleshooting guide below to see whether you can resolve the problem yourself. If not, please contact your dealer. Troubleshooting guide coffee making selection Symptom: Possible cause: Action: The appliance is not working and the lamps in the switch are not lighting up.
Troubleshooting guide coffee making selection Symptom: Possible cause: Action: The coffee is not hot enough There is no lid on the jug. Use the lid. The jug is too full or is overflowing. The set quantity is too high. Lower the quantity. See chapter 5.1 Setting the amount of coffee. Not enough coffee is getting into the jug. The set quantity is too low. Increase the quantity. See chapter 5.1 Setting the amount of coffee. E1 (filling time error). Appliance fills too slowly.
8. Consumer articles and accessories See the list below for the consumer articles and accessories available for the appliance. You can order these parts via your dealer, stating the details of the appliance given on the type plate, a description of the item, article number and quantity. Consumer articles Description Art.No. Qty Filter paper 90/250 01088 1 box 1000 pcs.
Table for setting the amount of coffee see chapter 5.1 Program == Ltr = =Ltr. Water volume Ltr. Display = = Ltr. 01/2009 Rev. 2.0 = Ltr.
Animo B.V. Headoffice Dr. A.F. Philipsweg 47 P.O. Box 71 9400 AB Assen The Netherlands Tel. no. +31 (0)592 376376 Fax no. +31 (0)592 341751 E-mail: info@animo.nl Internet: http://www.animo.eu Rev. 2.0 01/09 Art.