
Tus neeg siv phau ntawv
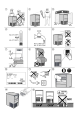
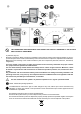

Table Of Contents

pag. 10
71504165-0-005
EN
tles and other similar things.
- During the normal operation, do not leave open the
door of the ice bin.
3.4 Connection to the electrical power
supply
! We decline any liability for damages to
persons, animals or things resulting from failure
to ground the equipment and the performance of
an electrical system which is not compliant with
applicable regulations.
Install an omnipolar mains disconnection device in the
power supply system which provides full disconnec-
tion under category III overvoltage conditions in ac-
cordance with current regulations.
The connection to the power network must be carried
out in accordance with applica
ble national regulations
and by qualied and authorised personnel.
Before connecting the equipment to the power
network, make sure that the network voltage cor-
responds to the one indicated on the identication
plate (Fig. 10).
Check that the electrical system is adequate to the
maximum absorbed power of the equipment indicat-
ed on the identication plate.
If the power cord of the equipment appears to
be damaged, it should be replaced with another
one having the specications compliant with the
regulations in force in the country of installation
and the replacement should be made by qualied
personnel so as to prevent any risk to the persons.
The earth conductor must be correctly connected to
an ecient earthing system.
The manufacturing company declines any liability
and any responsibility in terms of warranty if dam-
age to the equipment, persons and things are found,
caused by incorrect installation and/or by installation
which is not compliant with the laws in force.
4 COMMISSIONING
See the illustrative gures:
i Note: For a perfect water outow from the de-
vice, provide a minimum 3% slope of the pipe check-
ing that it is not subject to bottlenecks or siphoning.
It is recommended that the pipe discharges into an
open siphon (g.7).
I
Before electrically connecting the machine,
make sure that the network voltage corresponds to
the one indicated on the identication plate placed
on the back of the appliance (g. 10).
I
The maximum permitted tolerance on the volt-
age variation is of ± 10% of the rated value.
Provide an electrical supply circuit to the machine
with its own main omnipolar switch in order to guar-
antee an opening distance of the contacts which al-
lows the full disconnection under the conditions of
the overvoltage category III.
I Dimension the circuit according to the amper-
age indicated on the identication plate (g.10). The
electrical socket must be easily accessible
Once the correct connection to the hydraulic network
and to the electrical one is checked, open the water
feeding valve and insert the plug into the socket.
If the machine is in standby, the illuminated button
will ash every 30". To exit standby and to nally
start the machine, press the luminous switch for at
least 3 seconds, until the start of the machine is sig-
nalled with a long beep (g.9).
It is recommended not to use the rst 5 cycles of ice.
The ice maker is equipped with a temperature probe
present in the ice bin (g.14), which allows the ma-
chine and ice production to stop when the bulb
comes into contact with the ice accumulated in the
bin.
Never stop the water with the machine into opera-
tion, do not obstruct the air suction inlets.
Note: After the collection, release the control bulb
from any ice remainders for a faster resuming of the
production (g.14).
I Before electrically connecting the machine,
make sure that the network voltage corresponds to
the one indicated on the identication plate placed
on the back of the appliance (g. 10).
• Check that there are no abnormal vibrations due
to loosened screws.
• In case of intervention due to water leaks, tight
-
ening of screws or other, always stop the machine
rst.
• Check an ice cycle by checking that the cubes
are discharged into the bin.
• Check the operation of the bin probe (g. 14):
lay an ice cube on the bulb inside the bin, the ice
maker should stop within 1 minute and restart auto
-
matically after its removal, in a short time.
4.1 Ice cubes adjustment
As the room temperature changes, the size and
weight of the ice cubes may in turn change.
To adjust this size and weight, follow the procedure below: