
Operations Manual

INSTALLATION 3-8
O&M of the MCC-545B PACKET DATA RADIO
12/2000
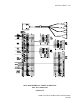
3.2.2.1 DC Power
Connect +12 to +14VDC to the power plug that mates with the power connector on the 545B
front panel. Refer to Table 3.1 for location and proper connections. Use large gauge wire (#16),
since the unit can draw up to 30 Amps during transmission. The power connector can only
accept #16 wires maximum. Use 2 #16 wires for positive and 2 #16 wires for negative. If runs
longer than about 6 feet are necessary, splice a large gauge wire (#10) onto the 2 #16 wires for
both positive and negative. The splice should be done within a foot or two of the 545B. (MCC
part number 14001261-03 is a 6' power cable with lugs for 3/8" post connection).
The shorter the DC power cable, the more RF power will be available for transmitting since there
will be less voltage dropped in the wires.
3.2.2.2 Antenna
Connect the antenna cable to the "BNC" RF connector on the front panel. Use double shielded
cable, such as RG-214 for long runs (100 feet). RG-223 can be used for runs less than 20 feet.
3.2.2.3 Ground Wire
Connect a heavy duty ground wire (#12 or larger) between the front panel ground stud and the
Station shelter ground.
3.2.2.4 Operator Port
Connect a standard RS-232 cable with a 9-pin male D connector to the OPERATOR port on the
front panel. Connect the other end of the cable to the local operator terminal
3.2.2.5 Data Port
Connect a standard RS-232 cable with a 9-pin male D connector to the DATA port on the front
panel. Connect the other end of the cable to the data-logging device. Refer to Appendix B for
more information on the 545B-to-data logger interface.
3.2.2.6 Auxiliary (AUX) Port
Connect a standard RS-232 cable with a 9-pin male D connector to the AUX port on the front
panel. Connect the other end of the cable to the GPS or other position location device. Refer to
Appendix C for more information on the 545B-to-GPS interface.