
User manual


5
Update
Introduction
CHARGING THE BATTERY VIA THE CRADLE
The battery may not be charged to full for shipment. When you first receive the package,
you will need to charge the battery to full before using the scanner. Please follow the
steps below.
Note: It takes approximately 5 hours to charge the battery to full (from the power
adaptor). Battery charging stops when the temperature drops below 0°C or
exceeds 40°C. It is recommended charging the battery at room temperature
(18°C to 25°C) for optimal performance.
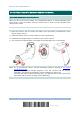
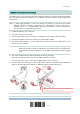
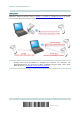
1) Install the battery to the scanner.
2) Seat the scanner in the cradle.
3) Connect the cradle to your computer or notebook via the USB or RS-232 cable.
4) Connect the power cord of the cradle to a proper power outlet.
5) The power LED indicator on the cradle turns solid red after the USB cable or the
power cord is connected.
Warning: RS-232/USB interface both require connecting the power supply cord.
When the cradle is solely on USB power, the current may be insufficient for
it to function normally. Therefore, we suggest connecting the power supply
cord.
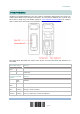
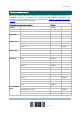
6) The scanner LED indicator will be flashing red during charging.
When the charging is done, the scanner LED indicator turns off.
If a charging error occurs, the scanner LED indicator turns solid red.
7) The LED for communications on the cradle will first become solid blue while initializing.
Refer to the table above for details on different stage of communications.
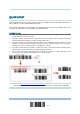
Warning: If the two pivot bolts are not tightened properly, charging error may occur.
The two pivot bolts need to be tightened,
o
r char
g
in
g
error ma
y
occur.