
Installation Instructions

INS #
Brand Logo
reversed out of
black
INS #
IL502115EN
IMPORTANT: Read carefully before installing fixture. Retain
for future reference.
WARNING
Risk of fire, electrical shock, cuts and or other casualty
hazards. This product must be installed in accordance
with the applicable installation code by a qualified
electrician or a person familiar with the construction
and operation of the product and the hazards involved.
Cooper Lighting assumes no responsibility for claims
brought about by improper or careless installation or
handling of this product.
ATTENTION
Receiving Department: Note actual fixture description
of any shortage or noticeable damage on delivery
receipt. File claim for common carrier (LTL) directly
with carrier. Claims for concealed damage must be
filed within 15 days of delivery. All damaged material,
complete with original packing must be retained.
CAUTION
Edges may cut. Handle with care.
CAUTION
Risk of burn. Disconnect power and allow fixture to cool
before changing bulb or handling fixture.
WARNING
Risk of fire and electric shock. If not qualified, consult
an electrician.
NOTICE
Green ground screw provided in proper location. Do not
relocate.
NOTICE
Lamps contain mercury, dispose according to local, state,
or federal laws.
NOTICE
If supply wires are located within 3 inches of ballast, use
wire rated for at least 90°C (194°F).
INSTALLATION
Standard Wiring for 100% light output
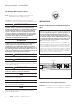
Note: This fixture is designed to allow dimming by having
lamps controlled separately. If you do not wish to use
this dimming feature and desire 100% light output,
you must combine the incoming hot (black wire) lead
with both hot leads (usually black or gray or red wires)
coming from the ballast using a “jumper” wire in the
quick disconnect ports as per the instructions below.
Connect the incoming white (neutral) lead with the white
lead from the ballast using the quick connector port.
Combine the two hot (usually black/gray/red) leads coming
from the ballast by making a connection in the quick
disconnect ports using a separate “jumper” wire
(Figure 1). Then connect the incoming hot (black wire)
lead to ballast hot leads by using the quick disconnect port.
Wiring Instructions – 4 Lamp T5HO
Instructions de câblage pour modèle à 4 lampes T5HO
Instrucciones de instalación: Luminaria de 4 lámparas T5HO
R
E
N
E
W
A
B
L
E
R
E
S
O
U
R
C
E
R
E
C
Y
C
L
A
B
E
B
I
O
D
E
G
R
A
D
A
B
L
E
Figure 1.
Jumper Wire
White
Black
Black
Gray
White
Ballast