
User Manual


15
ENGLISH
Check valve (optional accessory)
blocked.
• Clean, replace if necessary.
Water leaks between motor and
pump, Duocone seal worn.
• Replace Duocone seal.
Pump blocked or out of order.
• see above.
Pressure too low:
Suction line leaky or too m
uch suc-
tion head.
• see above.
Pump blocked or out of order.
• see above.
Pres
sure switch incorrectly
adjusted.
• Check cut-in pressure and cut-
ou
t pressure, adjust if necessary.
Pu
mp starts even when drawing
only a small amount of water
(approx. 0.5 l).
• Too little precharge pressure in
the tank;
increase.
W
ater dripping from air charging
valve.
• Rubber bag in tank leaky;
re
place.
Switching intervals becoming more
frequent
(domestic water system clocks):
Ta
nk precharge pressure too low.
• Drain water completely from tank
a
nd correct precharge pressure.
The precharge pressure must be
between 1.2 and 1.8 bar.
W
ater leaking.
• The rubber bag inside the tank
n
eeds to be replaced.
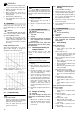
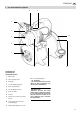
8.2 Adjusting the Pressure
Switch
If – in time – the factory-set cut-in pres-
sure or cut-out pressure has changed
consi
derably, the original setting can be
restored (see "Technical Specifica-
tions").
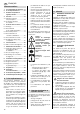
B
Danger!
Risk of electric shock by the
term
inals inside the pressure switch.
Only qualified personnel is allowed to
open and adjust the pressure switch.
1. Remove the pressure switch cover.
2. Open pressure line (open tap or
spr
ay nozzle) and drain water com-
pletely.
When the pumps starts, note cut-in
pre
ssure indicated by the pressure
gauge.
3. Close the pressure line again.
When the pumps stops, note cut-out
pre
ssure indicated by the pressure
gauge.
A
Caution!
The factory-set cut-out pres-
sure must not be exceeded.
4. To change the cut-out pressure, turn
nu
t (12)
turn cloc
kwise to increase the
cut-out pressure;
turn
counter-clockwise to reduce
the cut-out pressure.
5. To change the cut-in pressure, turn
nu
t (13) as follows:
turn cloc
kwise to increase the
cut-in pressure;
turn
counter-clockwise to reduce
the cut-in pressure.
6. If necessary, repeat steps 2.
through 5. until the desired values
are set.
7. Replace the pressure switch cover.
8.3 Increasing the Precharge
Pressure
When – in time – the pumps starts after
only small amounts of water are drawn
(approx. 0.5 l), the precharge pressure
in th
e tank must be restored to the origi-
nal level.
3
Note:
The air charge pressure can not
be taken from the pressure gauge.
1. Unplug.
2. Open pressure line (open tap or
spray nozzle) and drain water com-
pletely.
3. Unscrew the plastic cover on the
fron
t side of the tank; the charging
valve is located behind itl.
4. Connect air pump or compressor
ho
se with a "car tyre" type connector
and pressure gauge to the charging
valve.
5. Inflate to the intended precharge
pressure (see "Technical Specifica-
tions").
6. Plug pump in again and check func-
tion.
A
Danger!
Repairs to electric tools must
only be carried out by a qualified
electrician!
Electric tools in need of repair can be
sent to an authorized service center in
your country. See spare parts list for
address.
Please attach a description of the fault to
the electric tool.
The packaging of the pump can be
100 % recycled.
Worn out power tools and accessories
contai
n considerable amounts of valua-
ble raw and plastic materials, which can
be recycled.
For this pump the following accessories
are ava
ilable from your dealer.
3
Note:
Illustrations and stock numbers
are shown at the end of this manual.
A Pump Installation Package,
(MSS 310 – HWA/P), complete with
dou
ble nipple, check valve, filter
short, washable filter cartridge, spi-
ral hose assembly 1 m, thread seal-
ing tape.
B Pump Instal
lation Package,
(MSS 380 – HWW), complete with
dou
ble nipple, check valve, filter
short, washable filter cartridge, spi-
ral hose assembly 1 m, thread seal-
ing tape.
C Pump Instal
lation Package,
(MSS 200 – HWW/P), complete
with dou
ble nipple, check valve, fil-
ter short, washable filter cartridge,
spiral
hose assembly 1 m, thread
seali
ng tape.
D Pump Instal
lation Package,
(MSS 1000 – HWA), complete with
dou
ble nipple, check valve, filter
short, washable filter cartridge, spi-
ral hose assembly 1 m, thread seal-
ing tape.
E F
ilter (for garden pumps),
1" connection, short,
c/w washable synthetic material fil-
ter cartridge.
F Filter
(for domestic water systems),
1" connection, short,
c/w washable synthetic material fil-
ter cartridge.
G Spiral
Suction Hose 1" (standard)
1) 4 m, c/w quick release screw fit-
ting and strainer with foot valve;
2) 7 m, c/w quick release screw fit-
ting and strainer with foot valve;
H Spiral
Suction Hose 1" (profes-
sional)
1312
9. Repairs
10. Environmental Protection
11. Available Accessories