
Instruction manual

Setting
30
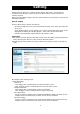
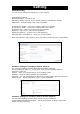
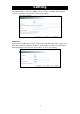
● Recording cycle
Set a time interval for alarm recording.
-Scheduled Recording
ON: Images are recorded in accordance with schedule and recording interval.
Setting to ON will set a recording schedule and interval.
OFF: Continuous recording is not performed.
-Overwrite
ON: Records are overwritten beginning with old records when the capacity of the
SD memory card becomes full during recording.
OFF: Recording is stopped when the capacity of the SD memory card becomes
full during recording.
3 Click the Save button under the items.
・ Changes are saved.
NOTE
● Clicking the Reboot button to reboot the camera.
● Clicking the Default button resets settings back to factory default.
● The total number of recorded frames per alarm will be the number of pre-alarm
images + One image when alarm occurs + Number of post-alarm images
● To enable "Alarm In", see the "Camera/Event Settings" portion.
● Setting the Overwrite mode to ON deletes files beginning with old files. If
important data is to be saved, set the Overwrite mode to OFF.
● Getting a record list of the SD memory card sometimes takes more than 5 minutes
after turning the power on. Data cannot be recorded while obtaining a record list.
● The camera recording period may not operate as set depending on the type of the
SD memory card.
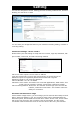
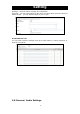
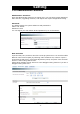
-Recorded Files
Image files recorded in an SD memory card can be deleted.
1 Click "Camera Settings" in the setting menu.
・ A sub menu for Camera settings will appear.
2 Click "SD Recording" in the sub menu.
・ A setup screen for Camera/Recording will appear.
3 Click "Delete all", "Delete from Alarm Recording list...", or "Delete from
Continuous Recording list..." in Recorded Files.
・ Clicking "Delete all" deletes all record files.
・ Clicking "Delete from Alarm Recording list..." displays an alarm list. Specify a
range for deletion deletes alarm record files.
・ Clicking "Delete from Continuous Recording list..." displays a normal list.
Specifying a scope for deletion deletes normal record files.
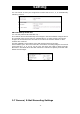
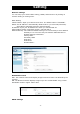
-View Recorded Files
Users can browse the recorded images in the SD card with IE or Windows Explorer
by the following procedure on the conditions that they have set the camera to record
images by event, motion detection, or schedule (please refer to “Event Recording”
or “Scheduled Recording” for related setting).
1. Tick “Insert SD Utility Card” and then press the “Execute” button if you insert SD
card into the camera.
2. Enable the FTP function (Network SettingFTP Server). Tick “ON” to enable the
FTP function and enter a login ID and password.
3. Users can see storage through IE or Windows Explorer. Open a new IE and enter
ftp://<the
camera’s IP address>. Then it will pop out a window which requires
you to enter a login ID and password.
4. Or open Windows Explorer and enter ftp://<the
camera’s IP address>. Then it
will pop out a window which requires you to enter a login ID and password.
2.6 Camera/ FTP Recording Settings