
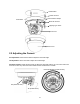
User manual


Port forwarding is ba
sed on the service you want to provide. For example, forward HTTP port to enable
remote web access to your camera, or RTSP port to enable access to video/audio streams from the
camera.
If your camera is configured to use a non-standard HTTP port, then you have to forward that port
accordingly.
3.2 Accessing the Camera for the First Time
The camera comes with a web-based setup utility, allowing you to view the video of the camera and
configure the camera for optimal use in your environment.
To access the camera’s web-based control utility, you need a PC that meets the following requirements:
Operating System: Windows Vista® or XP
Browser: Internet Explorer Version 6.0 or later
CPU: Intel Pentium 4.2 GHz or higher
RAM: 512 MB or more
Then take the following steps to connect your PC to the camera.
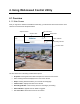
Step 1: Make the connection
For initial setup purposes, connect one end of an Ethernet cable to the RJ45 connector of the camera and
the other end to the LAN port on your PC.
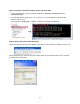
Step 2: Configure your PC’s IP address
The camera uses a default IP address of 192.168.1.30 and
subnet mask of 255.255.255.0. To have your PC on the same
network with the camera, configure your PC’s IP settings as
below:
IP address: 192.168.1. X, where X is a number
between 2 to 254, excluding 30.
Subnet mask: 255.255.255.0.
Ignore all other settings and click OK.
14