
User's Manual


Install the AP300
© 2010 Meru Networks, Inc. Installing AP300 21
AP1000 Beta Test
3. Using the template, drill holes in the ceiling tile.
4. Replace the ceiling tile.
5. Remove a ceiling tile adjacent to the newly drilled tile for access purposes.
6. Feed the Antenna Mount cable through the larger hole in the ceiling tile until the Antenna Mount
is flush with the ceiling. The screw should now be visible above the ceiling tile (through the second
hole).
7. Place the triangular plate above the ceiling tile with the screw aligned through the plate.
8. Drop the washer onto the screw and tighten the bolt.
The Antenna Mount is now connected to the ceiling.
9. Replace the adjacent tile.
10. Connect the three Remote Antenna Mount cables to the appropriate connectors on the AP300. Be
sure to connect the three antennas that correspond to one radio. Radio 1 uses A1, A2, A3 and Radio
2 uses A4, A5, A6.
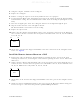
11. Attach three antennas that shipped with AP300 to the three connectors on the triangular remote
device. See Figure 8.
Install the Remote Antenna Mount on a Wall
1. Reorient the cable on the Remote Antenna Mount by removing the three screws on the back,
removing the small cover, reorienting the cable and then replacing the three screws. Discard the
small cover.
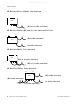
2. Connect the three Remote Antenna Mount cables to the appropriate ports on the AP300. Be sure to
connect the three antennas that correspond to one radio. Radio 1 uses A1, A2, A3 and Radio 2 uses
A4, A5, A6. PSM3x devices only utilize A1, A2, A3, and A5.
3. Attach three of the antennas that shipped with AP300 to the three ports on the triangular remote
device.
4. Orient the connected AP300 horizontally so that you can read the Meru logo without tilting your
head at 90 degrees - this orientation provides optimum MIMO performance.
Meru
A1
A5
A6
A4 A3 A2
Meru
A1
A5
A6
A4 A3 A2