
User's Manual
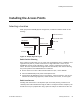
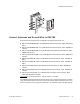
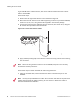

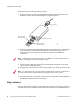
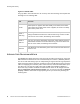
Table Of Contents
- About This Guide
- Meru Access Points and Radio Switch
- Installing the AP300
- Installing the AP200
- Installing the OAP180
- Installing the AP150
- Installing the RS4000
- Specifications
- AP Accessories
- Mounting Bracket Stencils
- Cautions and Warnings
- Regulatory Information

Installing the Access Points
© 2008 Meru Networks, Inc. Installing the OAP180 53
2. For extra protection against rain or moisture, apply weatherproofing tape (not
included) around the Ethernet connector.
3. Ground the unit with an appropriate grounding wire (not included) by attaching it to
the grounding screw on the unit. See above.
Console PoE
Console Port PoE (Ethernet) Port
00205
E
thernet
C
able
Ground Wire
Caution!
Equipment shall be installed in accordance with the National Electrical Code
ANSI/NFPA 70 and the Canadian Electrical Code, Part 1, and when applicable, the National
Electrical Safety Code, IEEE C2.
Equipment shall be properly grounded according to Chapter 8 of ANSI/NFPA 70, the
National Electrical Code (NEC) and the Cable distribution system should be grounded
(earthed) in accordance with ANSI/NFPA 70, the National Electrical Code (NEC), in
particular Section 820.93, Grounding of the Outer Conductive Shield of a Coaxial Cable.
The separate protective earthing terminal provided on this product shall be permanently
connected to earth.
Caution!
Do not locate the power injector outdoors. The unit is for indoor use only.
Note:
The wireless Ethernet port does not support Power over Ethernet (PoE) based on
the IEEE 802.3af standard. Do not try to power the unit by connecting it directly to a
network switch that provides IEEE 802.3af PoE. Always connect the unit to the included
power injector module to maintain the warranty.
Note:
Each AC power injector requires 1.5 amps of power at 100-240 volts. When
connecting multiple devices to one outlet, be sure to allow 1.5 amps for each AC power
adapter.