
User's Manual
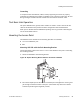
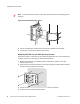
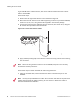

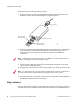
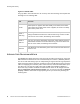
Table Of Contents
- About This Guide
- Meru Access Points and Radio Switch
- Installing the AP300
- Installing the AP200
- Installing the OAP180
- Installing the AP150
- Installing the RS4000
- Specifications
- AP Accessories
- Mounting Bracket Stencils
- Cautions and Warnings
- Regulatory Information

52 Meru Access Point and Radio Switch Installation Guide © 2008 Meru Networks, Inc.
Installing the Access Points
ing an OAP180 with a remote antenna, first mount remote antennas and then connect
them to the OAP180.
Follow these steps:
1. Remove the two right-most antenna covers indicated in Figure 8.
2. Mount the external antenna on the same supporting structure as you did the OAP180,
within 3 m (10 ft.) of it, using the bracket supplied in the antenna package.
3. Connect the antenna to the OAP180’s N-type connector (5G-1 and 2.4G-1) using the
RF coaxial cable provided in the antenna box.
Figure 30: Connect the Antenna Cables
4. Apply weatherproofing tape to the antenna connectors to help prevent water entering
the connectors.
Follow these steps to attach the Ethernet cable and ground wire:
1. Using the included cable, attach the Ethernet cable to the Ethernet port on the
OAP180.
2.4G-2
2.4G-15G-2
5G-1
RF Coaxial
Cable
00204
5 GHz External
High-gain Panel
Antenna
2.4 GHz External
Omnidirectional
Antenna
5
GHz N-type
C
onnector (5G-1)
2.4 GHz N-type
Connector (2.4G-1)
Note:
When not using antenna connectors on the OAP180, keep the covers securely
attached for weather protection.
Note:
Use only the provided Ethernet cable. Do not shorten this cable as the path loss is
needed. During periods of lightning activity, do not connect or disconnect cables or
otherwise work with the OAP180.