
Installation Guide
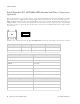
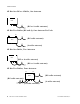
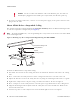
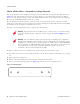
Table Of Contents
- About This Guide
- Access Points
- Installing AP300
- Safety Precautions
- Best Practices for an AP300/AP1000 Network
- Unpack the AP300
- Determine Power Requirements
- Installation Requirements
- Install the AP300
- Select a Location
- Attach the Provided Antennas
- Install the Remote Antenna Mount (optional)
- Install External ACC-ANT-MIMO-MNT Antenna with Three Connectors (optional)
- Install Remote ACC-ANT-6ABGN-24 Antenna with Six Connectors (optional)
- Install Antennas With One Connector (optional)
- Install the Access Point
- Check AP300 LED Activity
- Where to Go From Here
- Installing AP320i
- Installing AP332e
- Installing AP332i
- Cautions and Warnings
- Regulatory Information
- Supported PoEs
- Optional External Antennas

26 Meru Access Point Installation Guide © 2012 Meru Networks, Inc.
Install the AP300
Mount AP300 Above a Suspended Ceiling (Plenum)
Use the optional T-bar box hanger mounting kit to mount AP300 above suspended ceiling T-rails (see
Figure 11). The installation attaches the T-bar box hanger to the ceiling rails and then the AP300
attaches to the T-bar box hanger. Note that AP300 mounted above the ceiling has about 2-3 dBm less
RF coverage than AP300 mounted under the ceiling.
The AP300 with the metal enclosure exposed meets the requirements for fire resistance and low
smoke-generating characteristics required by Section 300-22(C) of the National Electrical Code (NEC)
for installation in a building’s environmental air space.
You may need to modify thicker tiles to support this installation.
To mount an AP300 above the ceiling with the optional T-bar kit, follow these steps:
1. Determine the location on the ceiling rails where the AP will be mounted and remove the ceiling
tile.
2. Unpack the T-bar hanger kit.
3. Remove the mounting bracket plate from the underside of the AP300.
4. Locate the mounting bar (depicted in Figure 10) and the two screws provided for it.
Figure 10: Mounting Bar
Warning!
When installed in air-handling spaces, such as above a suspended ceiling,
power the AP300 only with a PoE, not a power supply. See Power Supplies for part
numbers.
Warning!
Any Fast Ethernet (FE) cables installed in air-handling spaces should be
suitable under NEC Article 800.50 and marked accordingly for use in plenums and air-
handling spaces with regard to smoke propagation, such as CL2-P, CL3-P, MPP (Multi
Purpose Plenum), or CMP (Communications Plenum). Use Ethernet cable that meets
the requirements for operating in plenums and environmental air space in
accordance with Section 300-22(C) of the NEC.