
User's Manual
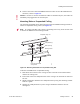

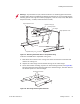


Table Of Contents
- About This Guide
- Meru Access Points and Radio Switch
- Installing the RS4000
- Installing the AP200
- Installing the AP150
- Specifications
- Regulatory Information
- Channels
- Mounting Bracket Stencils

Where to Go From Here
© 2007 Meru Networks, Inc. Installing the AP200 43
13. Check that the AP200 is operating correctly before replacing the ceiling tile to
the ceiling. Verify correct operating using the LEDs, as shown in Checking LED
Activity.
Where to Go From Here
Now that the AP200 is installed, go to the Meru System Director Getting Started
Guide for instructions on initializing the controller and connecting the controller and
APs to the Ethernet switch to form the WLAN. Return to this chapter to check the
status of the LEDs once the WLAN is operational.
Checking LED Activity
Access point status LEDs are provided on the Ethernet connector and on the face of
the AP200.
Ethernet Connector LEDs
After the AP200 is connected, the LEDs near the RJ-45 connector should light, as
shown in Figure 30.
Figure 30: RJ-45 LEDs
The green LED on the left blinks if any Ethernet activity is taking place. If there is
no Ethernet activity, the LED is off. The LED on the right is solid green if an Ethernet
link is present. If no Ethernet link is present or connectivity is lost, the LED is off.
Ethernet activity
Link present
00129