
User's Manual
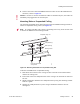

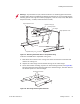


Table Of Contents
- About This Guide
- Meru Access Points and Radio Switch
- Installing the RS4000
- Installing the AP200
- Installing the AP150
- Specifications
- Regulatory Information
- Channels
- Mounting Bracket Stencils

Installing the Access Points
© 2007 Meru Networks, Inc. Installing the AP200 39
9. Connect one end of the PoE 100BaseT Ethernet cable to the 100/1000 Ethernet
connector, shown in Figure 22.
Mounting Below a Suspended Ceiling
The optional suspended ceiling mounting kit allows the AP200 mounting bracket to
attach to suspended ceiling T-rails (see Figure 26).
Note:
To comply with NEC code, attach a grounding wire to any of the screws used
to attach the AP200 to the mounting bracket.
Figure 26: Mounting the AP200 to a Suspended Ceiling Rail
To mount an AP200 below a suspended ceiling:
1. Determine the location on the ceiling rail where the AP will be mounted and
remove the ceiling tiles.
2. Place each of the two caddy fasteners on the ceiling T-rail and twist to attach to
the rail.
3. Adjust the distance between the caddy fasteners by using the mounting bracket
holes as a guide.
4. Tighten the caddy fasteners in place using a standard screwdriver. Do not
overtighten.
Caution!
Be sure to connect the Ethernet cable to the Ethernet port; the cable can
mistakenly be plugged into the Console port.
Suspended ceiling T-rail
Mounting bracke
t
Keps nuts with attached
locking washer
Caddy fastener(
s)
Plastic spacer(s
)
00102