
User's Manual
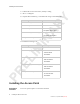

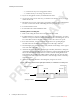
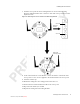
Table Of Contents

Installing the Meru Air Point 100 3
Revision 0.1, September 2003 (9/22/03)
Installing the Access Point
z
Relatively unobstructed access to the mobile stations that it will serve
z A power-over-Ethernet connection to the network switch servicing the controller
The access point communicates with mobile stations using radio waves like those
used by cordless phones. These radio waves can go through walls, floors, and
windows, but all of these reduce the range. Find a location where the radio waves can
get to the mobile station with as little obstruction as possible. In an office with cubi-
cles, mounting the access points on the ceiling or on the wall near the ceiling might
allow the radio waves to avoid furniture and cubicle walls.
The location must also have a 100BaseT power-over-Ethernet (PoE) connection from
the access point to the switch for the controller. The power can be supplied by a PoE
switch or by a PoE power injector between the switch and the access point.
Attaching the
Antennas
Attach the antennas to the connectors on the access point and hand tighten.
Mounting the
Access Point
Horizontal Mounting
1. Place the access point flat on the horizontal surface.
2. Point the antennas up.
3. Connect the PoE 100BaseT Ethernet cable.
Vertical Mounting
1. Mark the location for the two access point mounting screws. They must be 4 ½
inches apart, center-to-center, one above the other. If you are not using plastic wall
anchors, you must center the mounting screws on a wall stud. If you do not center
the mounting screws on a wall stud, you must use plastic wall anchors.
2. Drill holes at the locations you marked:
— 3/16-inch holes if you are using plastic anchors
— 1/8-inch holes if you are using only the screws
3. If you are using plastic anchors, install them in the holes.
4. Screw in the screws most of the way, so that the screw head is about 1/16 of an
inch from the wall.
5. Mount the access point on the screws, placing the circular portion of the keyhole
mounts over the screw heads and sliding the access point down.
6. Point the antennas up.
7. Connect the PoE 100BaseT Ethernet cable.
Mounting Below a Ceiling
1. Mark the location of the two mounting screws. They must be 4 ½ inches apart,
center-to-center.
2. Drill holes at the locations you marked: