
Stability Chair User Manual
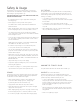


Stability Chair
™
Owner’s Manual
6
Assembly Instructions
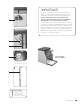
IMPORTANT: DO NOT TIGHTEN ANY BOLTS OR SCREWS DURING ASSEMBLY UNTIL YOU ARE INSTRUCTED TO DO SO.
PLEASE READ THESE INSTRUCTIONS COMPLETELY BEFORE BEGINNING ASSEMBLY.
Place all parts from the box in a cleared area and position them on the
floor in front of you. Remove all packing material from your area and
place them back into the box.
Do not dispose of the packing materials until assembly is completed.
To prevent unsafe or improper use, please read each step carefully
before beginning.
For assistance or to report any missing parts:
Call toll-free: North America 1-800-910-0001
United Kingdom 0800-328-5676
Email: customercare@merrithew.com
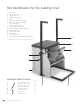
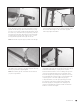
1 ALL MODELS Take horizontal frame complete with pedals [11]
and attach the wooden sides [12] to each side of the frame with
one 1/4"x 2" carriage bolt [17] and nut [22] ensuring ensuring that
the Logos are facing outward. Do not tighten.
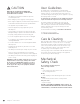
3 ALL MODELS Attach the seat support [14] between the two
wooden sides [12] at the front, using two 1/4"x 1-1⁄2" hex bolts
[18] with washers[23] on the outside, making sure the holes for
the chair seat are facing upwards.
2 ALL MODELS Slide vertical frame [13] between the two wooden
sides [12] at the back, making sure thewheels are facing to the
outside. Match the threeholes on each side of the wooden sides
[12] with those on the vertical frame [13] and attach them loosely
with six 1/4"x 2" carriage bolts [17] and nuts[22]. Do not tighten.
NOTE: Gently tap all carriage bolts from the outside to set them
into the wood. Then tighten the nuts on the inside.
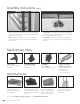
4a
MODELS WITHOUT HANDLES Attach the wooden sides [12] to
the horizontal frame [11] using 1/4"x2" carriage bolts [17] and
nuts [22]. Insert two 1/4"x1-1⁄2" hex bolts [18] and nuts [22]
with washers [23] in remaining holes on the wooden sides [12].
Tightenall hardware.