
Spring Wall User Manual
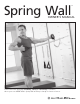

Spring Wall Owner’s Manual
4
Place all parts from the box in a cleared area and position them on the floor in front of you. Remove all packing material from your area and place
them back into the box. Do not dispose of the packing materials until assembly is completed. To prevent unsafe or improper use, please read each
step carefully before beginning.
For assistance or any missing parts:
Call: Toll-free in North America 1-800-910-0001 | Toll-free in United Kindom 0800-328-5676
Email customercare@merrithew.com
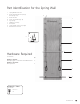
Please refer to the assembly instructions included in this Owner’s Manual for initial Installation & Assembly Instructions and Part Identification.
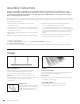
1 Find support studs in wall (typically 16"/ 40.64 cm apart)
and mark off location.
2 Position the back board 31/2 inches (8.9 cm) above the mat surface.
Use a builder’s level or set square to ensure Spring Wall’s length
is perpendicular to the floor.
3 Mark attachment point holes against the wall over the underlying
support studs.
4 Remove back board and drill appropriately sized holes through wall.
5 Position the back board and screw it firmly against the wall.
There are eight [8] attachment point screw holes.
On a standard drywall surface, when only one support stud can
be found, affix the remaining holes to the wall using butterfly toggle
anchors, slotted hex head wall anchors or other appropriate heavy-
duty drywall anchor fasteners. Brick walls require four masonry
fasteners.
6 Attach springs to back board using spring clips. Test stability
and solidness of the board to the wall before use.
Usage
SPRINGS
ROLL-DOWN SPRINGS
Attach roll down springs to eyehooks at desired height and ensure
they are securely attached with spring clips.
LEG SPRINGS
Attach leg springs to eyehooks at desired height. Ensure spring clips
are completely closed and secure.
LIGHT ARM SPRINGS
Attach light arm springs to eyehooks at desired height.
Ensure spring clips are completely closed and secure.
ROLL-DOWN BAR
Attach roll-down springs to roll-down bar, then to the fixed
eyehooks on the board. Both springs must be attached.
To increase resistance, substitute with the leg springs.
CAUTION: The roll-down bar can release at high velocity due
to the spring tension. Ensure a secure grip at ALL times. Gripper mats
can be used. Always ensure spring clips are completely
closed and secure.
SPRING CLIPS
Whenever springs are used, ensure spring
clips at both ends are closed completely.
A spring clip only half closed may come
undone and detach with high force.
PLEASE DO NOT ATTEMPT TO ASSEMBLE THIS ON YOUR OWN. Installation of this product requires a minimum of two people.
Wehighly recommend that you have this product installed by a professional contractor. Please read these instructions completely
before beginning assembly. improper installation voids equipment warranty. MERRITHEW will not be responsible for any injury or
damage resulting from improper installation.
Assembly Instructions