
Use and Care Manual


3
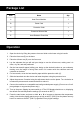
Package List
Item Name Qty.
A Heat Press Machine 1
B Power Cord 1
C Protective Cloth 1
D Protective Silicone Mat 1
E Heat-Resistant Foam Mat 1
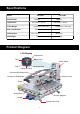
Operation
1. Open the device by lifting the pressure lever and slide out the base using its handle.
2. Place the foam mat (E) on the base.
3. Place the silicone mat (D) over the foam mat.
4. Lay the substrate that you will add your design to over the silicone mat, making sure it is
clean, dry, fl at, and well positioned.
5. Set the heat transfer paper holding your design at the desired location on your substrate,
making sure the image is facing down and in full contact with the substrate and well
centered on the base.
6. For best results, cover the heat transfer paper with the protective cloth (C).
7. Slide the base back into the device and lower the platen using the pressure lever.
8. Adjust the pressure if needed using the adjustment knob over the platen. Turn clockwise to
increase the pressure and counterclockwise to reduce it.
9. Connect the machine to a compatible and well-grounded power supply. (Do not use a 3-to-2
prong adapter or ungrounded power strip.)
10. Turn on the press, fl ipping its power switch to I. The LCD display should turn on, displaying
the default time and temperature settings (35 seconds at 400°F).
11. Press the start button and press or hold ▲ or ▼ to increase or decrease the temperature
setting. Note that the display panel can go as high as 482°F (250°C) but the platen can only
heat to a maximum of 400°F (200°C) regardless of any higher settings.