
Operating instructions


This is an adjustable, second stop position suitable for
ventilation, pedestrian or pet access, programmed to the Remote
Control.
To Activate this feature:
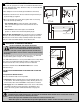
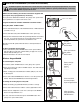
1.Start with the door fully CLOSED (figure 1). Drive the opener
UP and stop at the position required for PET access.
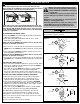
2.Enter PET activation mode by pressing the PROG and UP
buttons together for 3 seconds (figure 2). Release when the
Courtesy light flashes once.
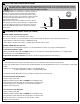
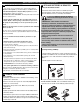
3.Press the Remote Control button that you have allocated for
this feature (figure 3). Do not use the button already allocated
for normal operation. The Courtesy light will flash once when
the code is accepted.
TEST: Press the Remote Control once, and door will close, press
again, and door will return to the preset position.
If the door is above the preset position, when the button
is pressed, it will fully close.
To Deactivate this feature:
1.Start with the door fully CLOSED.
2.Enter PET deactivation mode by pressing the PROG and UP
buttons together for 3 seconds (figure 1). The Courtesy light
will flash twice, indicating the deactivation has occurred.
NOTE: Erasing all remote control codes, as in the Wireless
programming section, will also delete this feature.
PARTIAL OPENING FEATURE (PET)
15
Indicator LED
Indicator LED
figure 1
figure 2
or
27
-
r
service
www m
@ m
B
B
A
2
3
1
F S Cll
It llt Dt
132A2900
RISKOF ENTRAPMENT
RepeatSafety Reverse Test monthly. Door
mustreverse on contact with a 40mm obstacle
placedon the floor. Make necessary adjustments.
AUTOMATICDRIVE:
Keepaway from the area of the door since it may
operateunexpectedly.
EMERGENCYRELEASE:
Torelease, pull down firmly on the red handle.
114A3361
F
orService Call
InstallationDate
26
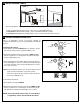
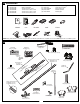
INSTALL WARNING LABELS
Three warning labels are provided with this opener: attach as indicated in the fig 1 to a clean and suitable surface.
1. Risk of entrapment: (English version) - place close to a fixed Wall Control(1).
2. EMERGENCY Release/Service label: - place on the Manual Release cord (2).
3. WARNING Child Entrapment: (triangle label) - place on a low inside panel of the door (3).
figure 3
figure 1