
Operating instructions


6
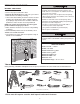
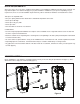
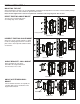
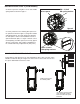
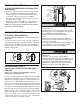
CHAIN ALIGNMENT CONSIDERATION
Min. 20mm
M
in. 20mm
INSTALLATION
IMPORTANT INSTALLATION INSTRUCTIONS
To reduce the risk of SEVERE INJURY or DEATH:
WARNINGWARNING
1. READ AND FOLLOW ALL INSTALLATION
WARNINGS AND INSTRUCTIONS.
2. Install door opener ONLY on properly balanced and
lubricated door. An improperly balanced door may not
reverse when required and could result in SEVERE
INJURY or DEATH.
3. ALL repairs to cables, spring assemblies and other
hardware MUST be made by a trained door systems
technician BEFORE installing opener.
4. Disable ALL locks and remove ALL ropes connected
to the door BEFORE installing opener to avoid
entanglement.
5 Mount emergency release handle no higher than 1.8m
above floor.
6. NEVER connect the door opener to power source
until instructed to do so.
7.NEVER wear watches, rings or loose clothing while
installing or servicing opener. They could be caught in
the door or opener mechanisms.
8. Install wall-mounted door control:
• within sight of the door.
• out of reach of children at minimum height of 1.5 m.
• away from ALL moving parts of the door.
9. Place entrapment warning label on wall next to multi-
function door control.
10.Place manual release/safety reverse test label in plain
view on inside of the door.
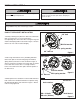
11.Upon completion of installation, test safety reversal
system. Door MUST reverse on contact with a 40mm
(1 1/2”) high obstacle placed on the floor.
Min.
20mm
M
in
.
20mm
Outboard
(conventional)
Inboard
(no side room)
Before installing, consider the relationship between the
opener and door in terms of the chain connection.
Clearances are indicated below to demonstrate the
range of sprocket positions available. Choose your
o
pener mounting location based on the drawing below.