Native Rate Series Native Rate Series Plus Digital Video Processor Installation and Operations Manual
TABLE OF CONTENTS Inventory List / Unpacking. . . . . . . . . . . . . . . . . . . . . . . . . . . . . . . . . . . . . . . . . . . . . . . . . . . . . . . . 2 Installation . . . . . . . . . . . . . . . . . . . . . . . . . . . . . . . . . . . . . . . . . . . . . . . . . . . . . . . . . . . . . . . . . . . . 2 Front Panel Control and Set up . . . . . . . . . . . . . . . . . . . . . . . . . . . . . . . . . . . . . . . . . . . . . . . . . . . . 4 System Menu. . . . . . . . . . . . . . . . . . . . . . . . . . .
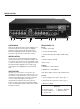
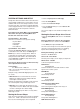
INSTALLATION 1 2 3 5 6 7 8 9 10 4 UNPACKING REAR PANEL I/O Remove the NR Series unit from the shipping container and examine it for any signs of shipping damage or missing items (check inventory list below). All shipping materials should be saved if the unit is to be moved or returned for service. Inputs 1. S-Video (4 Pin DIN) 2. Composite Video (BNC) 3. Interlaced Component (480i) or RGBs Video (BNC) INSTALLATION The processor can be either placed on a table or rack mounted.
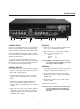
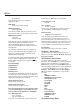
INSTALLATION 1 2 3 5 6 7 8 9 10 4 CONNECTIONS OUTPUTS Because of the high performance of the NR Series unit it is very important to use the highest quality cables possible, for both input and output signals. 15. D15F connector for use with computer monitors or to a second display device. 16. BNC connectors for main output to display devices.
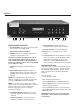
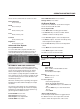
SETUP 123 4 5 6 7 FRONT PANEL CONTROL 8 9 10 11 18. Value Up/Down : Adjusts the levels or changes settings of the Function selected. 1. Power/Standby: Press to turn the unit On (LED turns Green) or to Standby (Red) 19. Custom Presets: Four presets per input. 2. Infrared Sensor/Flasher window 10. Enter: Press to store presets or to enter menus. 3. CPU Reset: push a small paper clip into this opening to reset the unit’s CPU. 11. Factory Preset: Recalls all settings to Factory levels.
SETUP SYSTEM SETTINGS AND SETUP • Select an Input (not Pass-Through) Setup offers functions that must be done when the unit is initially installed. Some user features are not available with a few of the Setup selections so this must be done first. To prevent accidental alteration of the setup parameters, some setup functions can only be done from the front panel or with the RS232 interface.
SETUP posite video is applied as sync with RGB) 0-255(0=Top) This sets the position of the single line adjustment OSD Composite Sync on H On/Off OSD Timer 4-255 seconds (10 Default) Sync on Green On/Off (Default) (Comp. Sync on H and Sync on Green Functions are only available if RGB output is selected.) HDTV Ext. Format 480p/720p/1080i This option is visible and only needs to be set if the transcode option is selected for the pass-thru.
OPERATING INSTRUCTIONS Select OSD Functions: Press Function Change Values: Press Value These are the controls that are used most often. Noise Reduction 0-15, Factory 8 On Screen Display 0-31, Factory 8 Control of most functions can be done using the remote to interact with the OSD. 0-255, Factory 128 Accessing the OSD • Press Menu button to bring up main Index. 0-255, Factory 128 • Use Function keys to select an index and the available control menu drops down.
RS232 NOTE: When using a Wide Angle screen a 4:3 source will have black bars on the left and right of the image. If filling the entire screen is desired, select Letterbox. The image will fill the screen but the top and bottom 1/3 of the image will be cut off. PATTERNS These patterns are used to setup and align the image. This should be done by a qualified technician only. Note: Anamorphic on a 4:3 screen is not available on units with scan rates below 720p.
SPECIFICATIONS Inputs (Interlaced) Format NTSC/PAL Auto Detect Composite(BNC) 1vpp S-Video Y - 1v pp C -286mv pp Component (SMPTE)(BNC) Interlaced (480i) Y—1vpp Cr—700mv pp Cb - 700mv pp RGB Comp. Sync—1vpp RGB-700mv pp HD/PC Pass-Thru D15M Remote Control “D9F” RS-232 ASCII Outputs (Progressive) R,G,B (BNC or DB15) 700mv pp, TTL Sync YprPb 700mv pp, Sync on Y-1vpp RGsB Gs - 1vpp RGB - 700mv pp D15F Pin 11 12 13 17 18 19 10 11 13 14 Horizontal Sync: NTSC: 31.5KHz, 37.
APPENDIX A – RS232 CODES COMMAND FUNCTION HELP Display Help Menu COMMAND ON Power ON ST E# OFF Power OFF W# CS# INPUTS G# V Video Input M# Y S-Video Input CS# X R YCrCb RGBS OSD# EXT Pass-Thru Input OSD# B# C# T# K# D# N# A# L# P# IMAGE CONTROL Brightness (0-255) (Factory 128) Contrast (0-255) (Factory 128) Tint (0-255) (Factory 128) OSDT# P# TP# Color (0-255) (Factory 128) Detail (0-15) (Factory 8) Noise Reduction (0-15) (Factory 8) Input Aspect Ratio (0-2) (0=4x3, 1=Letterbo
APPENDIX B – IR SETUP COMMANDS IR REMOTE TEACHING FUNCTIONS Use the Function key to locate IR Setup Menu-Press Enter. Use the Value key to select the different commands. Each time the Enter button is pressed it “flashes” the commands out through the IR receiver window on the front panel. The Number of Samples choice defines how many time the NRS will send the sample IR command.
LIMITED WARRANTY Faroudja Laboratories, Inc. (“Faroudja”) warranties that its products will be free of defects in workmanship and material and conform substantially to published specifications under normal use and service. This warranty is made to the first purchaser of the products and extends for twelve (12) months from the date of sale.