
Manual


21
9.7.3 Data Entry
These programmable registers are entered in the current Engineering Unit used by the gauge, which are illuminated
during edit of these programmable registers. For example, if the gauge is set to read in gallons/minute, and a value
of 110 is put into the P6 register the SET1 relay will energize at 110 gallons.
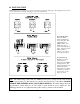
In Program Mode, the indicators “SET1”, “SET2”, and “4-20mA” will illuminate as appropriate to assist in
identifying the edited register. For example, when scrolling to and/or editing P6, “SET1” will illuminate indicating
that SET1 is being edited. The same indication applies to the access of the P7/“SET2” value. The “4-20mA” will
be illuminated if the gauge is a Current Loop model to indicate that the 4-20mA range is being edited.
9.7.4 Scaling Dependency
If the Engineering Unit is changed along with the appropriate scaling factors the value in the P6 and P7
programmable registers may also require correction to reflect the changes to the scaling and units.
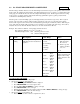
P#
Name Description Value Range Notes
P6
SET1 Controls SET1 relay or 4.00 mA
value.
–20% to +120% FS User defined value.
P6 cannot equal P7
P7
SET2 Controls SET2 relay or 20.0 mA
value.
–20% to +120% FS User defined value.
P6 cannot equal P7
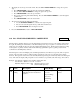
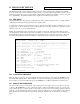
GAUGE IN MEASURE MODE
1. Press PRGM/ENTER to access P0 prompt
2. If lockout is in-active
prompt will be P0
• Increment P# using UP ARROW until P6 or P7 is displayed
• Press PRGM/ENTER to access the register value
• Press the UP or DOWN ARROWS to change each digit
• Press PRGM/ENTER to enter each digit
• When the flashing decimal point is displayed, Press the UP or DOWN ARROWS to change the decimal
point position and sign
• Press PRGM/ENTER to enter the decimal and sign
• Press the BACKSPACE to return to MEASURE MODE
3. If lockout is active
prompt will be L 00
• Enter Lockout Code then continue as in 2) above