
User manual


www.merging.com/horus Page 17 - 54
Horus User Manual
Connecting the MADI cable
The MADI port (both the standard one and the optional MADI Expansion module) can be connected
using either Optical or coaxial cabling.
When using Optical cabling, first ensure that you have a clean work area, as
dust and debris can affect the connection if any obstruction is present in the
connection. Remove the cap on both the cable and the port and slowly /
firmly push the cable into the receiving port on the Horus unit until it clicks
into place.
When Using a Coaxial connector. Slowly bring the Male cable up to the female port, ensuring
that the pin in the centre of the male cable lines up with the slot in the female port. Push the
connector firmly into place and twist the sleeve clockwise until it clicks into its locked position
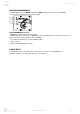
Connecting the Wordclock input/output
The Wordclock connections on the rear of the Horus unit are coaxial BNC’s.
To connect a ordclock source from an external device slowly bring the Male
cable up to the female port, ensuring that the pin in the centre of the male
cable lines up with the slot in the female port. Push the connector firmly into
place and twist the sleeve clockwise until it clicks into its locked position.
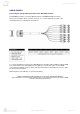
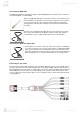
Connecting the Sync Cable
The Sync Cable (optional with each Horus unit) is a DB15 cable that connects to the “SYNC” port on
the rear of the Horus unit. The SYNC cable provides connectivity for MIDI, LTC and Video Reference
Input and Output for the Horus unit. To fix this cable to the Horus unit, line the Male cable up with the
female DSUB port on the module. Then, with slight pressure, guide the connector into place. Then,
once the cable has been pushed into place, use the mounting screws on either side and fasten them
to finger-tightness.