
User guide

OWC MERCURY ELITE PRO DUAL
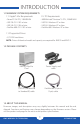
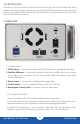
SYSTEM SETUP
7
2.3 RAID SETTINGS
!
!
WARNING: Changing the RAID mode will destroy the
data on the drives. Be sure to back up your data rst! See
section 3.3 for information on proper backup strategies.
2.3.1 Changing the RAID Mode
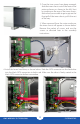
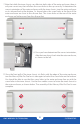
The RAID mode on the Mercury Elite Pro Dual is controlled by three switches inside the
unit, as shown below. You can access the switches by removing the clip-in fan at the rear
of the enclosure. The following chart shows the switch positions for various RAID modes:
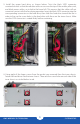
To change the RAID mode, first turn off the Mercury Elite Pro Dual. Access the switches
by removing the clip-in fan, then adjust the switches according to the following chart.
Replace the fan, then turn on the Mercury Elite Pro Dual. When you turn the Mercury Elite
Pro Dual back on, it will be set to the new RAID mode. You can then format the new RAID
volume and use it immediately .
See Section 2.3.2, RAID Modes for more information on each RAID mode that can be
used.
2.3.2 RAID Modes
Span Mode:
The drives show up as one large single volume. The total size will depend on the drives
installed; you can use drives of different capacities. A span is a configuration (not RAID) in
which the data is written sequentially across the drives. This combines the capacities of
the drives, but it does not provide any performance or redundancy benefits.
RAID 0 “Drive Striping” Mode:
The drives show up as one large single volume with a size equal to the combined
capacities of both drives. RAID 0 is used when speed is the primary objective, but it does
not have any redundancy for protection. Data is alternated very quickly across both
drives to gain speed by distributing the workload. This allows for the fastest data transfer
rates, but if one drive fails, the whole array can become corrupted and data will be lost.
Always maintain a backup of your data!
MODE SW#1 SW#2 SW#3
RAID 1
(NOT RECOMMENDED)
--- OFF OFF
RAID 0
--- OFF ON
SPAN
--- ON OFF
2TB MODE
ON --- ---