OWC Mercury Elite Pro Dual mini ASSEMBLY MANUAL & USER GUIDE
TABLE OF CONTENTS 1. INTRODUCTION....................................................................................... 1 1.1 MINIMUM SYSTEM REQUIREMENTS 1.1.1 Apple® Mac Requirements 1.1.2 PC Requirements 1.1.3 Supported Drives 1.2 PACKAGE CONTENTS 1.3 ABOUT THIS MANUAL 1.4 REAR VIEW 1.4.1 Rear Features 1.5 LED INDICATORS 2. SYSTEM SETUP......................................................................................... 3 2.1 QUICK START 2.2 ASSEMBLY 2.3 RAID SETTINGS 2.3.1 Changing the RAID Mode 2.
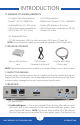
INTRODUCTION 1.1 MINIMUM SYSTEM REQUIREMENTS 1.1.1 Apple® Mac Requirements 1.1.2 PC Requirements • PowerPC G4 CPU, 128MB RAM • 500MHz Intel® Pentium® 3 CPU, 128MB RAM • FireWire 800: Mac OS X 10.2 or later • FireWire 800: Windows® XP or later • USB 3.0 (backwards compatible to USB 2.0): Mac OS X 10.2 or later • USB 3.0 (backwards compatible to USB 2.0): Windows XP or later 1.1.3 Supported Drives • 2.5” SATA hard drives (HDDs) or solid-state drives (SSDs) up to 12.5 mm tall.
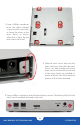
Pro Dual mini does not support bus-powering other devices. 2. USB 3.0 port — Attach the included USB 3.0 (Standard-A to Micro-B) cable here. 3. On/off switch — Turn on and off the Mercury Elite Pro Dual mini here. 4. Power input — Connect the 12V power adapter here (sold separately). NOTE: • When connected using FireWire, the Mercury Elite Pro Dual mini will receive all necessary power from the computer through the FireWire port. However, the USB connection does not provide as much power as FireWire.
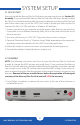
SYSTEM SETUP 2.1 QUICK START If you purchased the Mercury Elite Pro Dual mini as an empty enclosure, see Section 2.2, Assembly. If you purchased the Mercury Elite Pro Dual mini with drives already installed, the OWC Drive Guide formatting utility has been installed on your Mercury Elite Pro Dual mini. Follow these steps to use the OWC Drive Guide to format your Mercury Elite Pro Dual mini for Mac OS X (10.4 and later) or Windows (XP and later). 1.
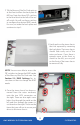
2. Tilt the Mercury Elite Pro Dual mini up at the front to allow the back plate to fall free. Note the three DIP switches in the blue block to the left of the on/ off switch. You will use these switches to configure the desired RAID mode. For now, set aside the back plate and continue to step 3. 3. Gently push on the inner chassis that was exposed by removing the back plate. The inner chassis should slide easily out of the outer enclosure.
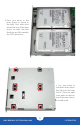
5. Place your drives in the inner chassis as shown to the right. Press each drive toward the rear of the inner chassis to make sure that the drives are fully seated in the SATA connectors. 6. Use one hand to hold both drives down, then flip over the inner chassis. There are eight screw holes on the bottom of the inner chassis, as circled in red.
7. Using a Phillips screwdriver, insert the eight included screws into the screw holes to fasten the drives to the inner chassis, as shown. When this is done, flip the inner chassis back over. 8. Slide the inner chassis back into the outer enclosure. Note that the inner chassis can slide in either end of the outer chassis, but the rails on one end of the outer chassis are notched, as shown to the left. This allows the back plate to sit flush when attached. 9.
2.3 RAID SETTINGS ! WARNING: Changing the RAID mode will destroy the data on the drives. Be sure to back up your data first! See section 3.2 for information on proper backup strategies. 2.3.1 Changing the RAID Mode ! The RAID mode on the Mercury Elite Pro Dual mini is controlled by a set of three DIP (dual in-line package) switches located in a blue block inside the enclosure. Section 2.2, Assembly shows how to access the DIP switches.
2.3.2 RAID Modes Span Mode: The drives show up as one large single volume. The total size will depend on the drives installed; you can use drives of different capacities. A span is an array (not RAID) in which the data is written sequentially across the drives. This combines the capacities of the drives, but it does not provide any performance or redundancy benefits. RAID 0 “Drive Striping” Mode: The drives show up as one large single volume with a size equal to the combined capacities of both drives.
APPENDIX 3.1 TROUBLESHOOTING First, verify that both ends of your cable are properly plugged into the computer and the Mercury Elite Pro Dual mini. After that, try connecting to another interface (USB or FireWire). You can also connect the Mercury Elite Pro Dual mini to a different computer. The USB connection does not provide as much power as FireWire. When connecting over USB, an external power adapter is required. 12V power adapter is available at: http:// eshop.macsales.
Changes: The material in this document is for information only and subject to change without notice. While reasonable efforts have been made in the preparation of this document to assure its accuracy, Other World Computing assumes no liability resulting from errors or omissions in this document, or from the use of the information contained herein.