
Owner`s manual


Mercury Mambo Powered Wheelchairs Part Code: Z20945 (Rev B)
Owners Manual Page 15 of 28
5.6 REMOVAL & HEIGHT ADJUSTMENT OF THE SEAT (MAMBO MINI)
To remove the Mambo Mini seat:
♦ Switch the Mambo off and ensure it is not in freewheel mode
♦ Disconnect the controller or remove the armrest on which the controller is mounted
♦ Slacken the tri-knob securing the seat post in the seat post receiver on the powerchair base
♦ Unlock the locking pin and remove from the seat post.
♦ Lift up the seat to remove
To install the Mambo Mini seat:
♦ Reverse the procedure above ensuring that the seat locking pin is securely locked and that the tri-knob is
sufficiently tightened
To adjust the Mambo Mini seat height:
♦ Remove the seat following the procedure above
♦ On the removed seat there is a rectangular collar which determines the seat height
♦ Remove the locking pin from the rectangular collar and adjust the collar for the required seat height
♦ Reinsert the locking pin to secure the rectangular collar
♦ Reinstall the seat following the procedure above.
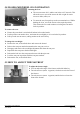
5.7 REMOVAL & HEIGHT ADJUSTMENT OF THE SEAT (MAMBO STANDARD)
To remove the Mambo Standard seat:
♦ Switch off the Mambo and make sure it is not in freewheel mode
♦ Remove the armrest with the controller attached
♦ Simultaneously depress the two plungers (arrow 1 opposite) on the
front of the seat frame while lifting the front of the seat
♦ Lift the seat up and gently lower it back on to the rear seat towers
♦ Pull the seat forward and lift it off the rear seat towers
To install the Mambo Standard seat:
♦
Reverse the procedure above, ensuring the seat is locked in position
both at the rear and via the two plungers at the front
To adjust the Mambo Standard seat height:
♦
Remove the seat using the procedure previously described.
♦ Remove the shroud
♦ Disengage and remove the seat height adjustment pin from the seat
post
♦ Raise or lower each post to the required position
♦ Reinstall the seat height adjustment pin through the seat post
♦ Reinstall the shroud and seat and reconnect any parts disconnected
during adjustment.